Floor brackets for aluminum radiators. Brackets for radiators
Fastening heating radiators to the wall is a fairly simple process, and does not require specialized skills from the installer. It is enough to know some basics of the fluid circulation inside the heating system, the functional purpose of each element, and have an idea of \u200b\u200bhow to properly position the battery in the room to ensure the most efficient heat transfer without loss. This interesting process will be the focus of this article.
Instructions for attaching to the wall for heating radiators will be discussed in the second part of the article. In the meantime, let's talk about modern radiators, what they are, and what properties they have.
Cast Iron Radiators

Kings of the “Russian style” are cast-iron radiators. They have not been manufactured for the first hundred years, but are still popular among buyers. Models, such as shown in the photo above, are elite, and it is quite difficult to see them on the shelves of ordinary construction stores.

The situation is similar with budget models, but, nevertheless, we are all familiar with these radiators. Many of us in the apartments have simplified versions of these products from the recent Soviet past, which few people are in a hurry to change to more modern, aesthetic counterparts. And the point here is not at all that people cannot afford something else.
The reason is that cast iron batteries have several advantages over other competitors:
- High corrosion resistance - due to constant contact with the liquid, a plaque is formed on the inner walls of the cast-iron radiators, which is called “dry rust”. This is a kind of coating and protects the metal from destruction.
- High heat dissipation - This figure for cast iron is two times higher than the same parameters for steel radiators.
- Immunity to the chemical composition of watercirculating in the heating system - cast-iron batteries have thick collector walls, so they are not afraid of acid and salt impurities in the coolant.
- The service life of this product is 40-50 years.. Due to the fact that the diameter of the internal collectors of a cast-iron radiator is significantly higher than that of steel, aluminum and other analogs, rust, scale and other foreign fragments that inevitably form in the system during operation can circulate in the system.

- Reasonable costIn addition to models released by well-known brands, it is also an advantage of these batteries. Well, as for the aesthetics of this plumbing fixture, with a creative approach, it can even become an interior decoration. Above you can see a good example of finishing the old radiator.

All of the listed battery characteristics are provided by the chemical properties of cast iron.
But, like any other material, cast-iron radiators have their drawbacks:
- Very heavy product - this feature significantly complicates the rise to the floor and the installation process, which will require at least two strong people;
- Low aesthetics - This is especially true for models from the budget segment, which correctly fit into a modern interior is a rather difficult task;
- High heating time - This fact is the reason that cast-iron batteries are poorly suited for rooms where continuous heating is not required, for example, a country house.
Advice! When determining battery power, remember that the manufacturer indicates the power of only one section, not the entire structure.
Steel batteries

The heating system, assembled from panel steel radiators, is an excellent solution for use in public buildings, private houses or country cottages. For their popularity, these products owe value for money.
- The average price of a product with a heat transfer of 1900 W is 5000 rubles;
- The heat transfer of the material, although lower than that of aluminum counterparts, is still at an acceptable level;
- Modern urban aesthetics is also inherent in these products, which allows you to combine them with many design styles.

The design of steel radiators is a kind of layered “pie” consisting of panels, each of which includes channels for the coolant and a steel crate (convection fins). The more panels there are layers, the higher heat transfer it will have.
- By the number of layers, steel radiators are divided into three types: 11; 22; 33. In each of them, one, two and three layers are installed, respectively. The front sides of the batteries are covered with a blank panel. Above they are covered with a grill, and on the sides they have decorative panels with leads for fittings.
- The front one-piece panel is designed to radiate heat into the room, and the inner grill heats the air around it due to the effect of convection. The combination of these effects increases the heat transfer of these batteries.
- Steel radiators can have side or bottom connection. In the second case, models are often equipped with a built-in thermostatic valve, which allows you to adjust the heat transfer of the battery with your own hands.
Advice! Buying a steel radiator can take a lot of time due to the fact that not many stores can afford to keep on hand the entire rich assortment of these products. Therefore, most often, you have to wait for the order of the model you need, sometimes even from abroad.
Aluminum radiators

This type of battery has excellent structural features, which allowed it to become the most sought-after product in the niche of heating equipment.
What so attracts buyers in this product:
- These batteries are still among the most affordable on the market;
- Aluminum has a high heat transfer coefficient;
- Lightweight construction allows installation to one person;
- Many models have a built-in thermostat;
- Easy maintenance and modular design - if necessary, you can always equip the purchased radiator with additional sections, which will increase heat transfer;
- Radiators of this type have a service life of 20 to 25 years.
However, these radiator models have some drawbacks that we must mention:
- Convection heat transfer is much lower than that of steel radiators;
- Uneven temperature distribution over the surface of the radiator;
- Corrosion susceptibility: may over time require special treatment of the battery to prevent premature failure of the material.

What do you need to know when choosing an aluminum radiator? These batteries come in two types: reinforced and regular. The first is designed for working pressure inside the system up to 16 atmospheres, and the second - up to 6.
- Conventional radiators are designed for use in private homes, since the pressure in their heating systems is much lower than in general heating systems.
- In the manufacture of the correct radiator, the manufacturer must provide an internal protective coating of aluminum from acid and alkaline environments.
- If the label does not contain information on the availability of such processing, then be sure to read the product specification on the Internet, or ask the seller. Otherwise, it is better to refrain from buying such a radiator.
Today on the market are options for bimetallic radiators that combine the properties of steel and aluminum. Outwardly, they resemble aluminum models, so be careful not to buy what you need.
Other solutions

There are times when it is required to organize autonomous heating of individual rooms, without connecting to the heating network. For these purposes, oil and water radiators operating from the electric network are used. They are available in two versions: floor and wall.
- The first are mobile designs, and the wall ones are stationary options.
- Hanging the oil cooler on the wall is very simple, since the installation does not require a connection to the heating network. It is enough to bring an electric cable to the installation site, and install the battery on special brackets.
- Oil radiators consist of several heating plates that are welded together. The plates are formed in such a way that when they are connected, channels are formed inside the panel for the movement of the coolant, which is oil. Bottom of each channel are installed heating elements.
Due to the peculiarity of its structure, these radiators can be very narrow, but at the same time wide and high. Therefore, they are conveniently located in cramped aisles, behind furniture or under window openings without a window sill.
Accessories for mounting

When choosing brackets for overhanging heating batteries, you should pay attention not only to the design of the fasteners and the radiator itself, but also to the material from which this element is made.
To fix a heavy cast-iron battery, massive holders are used that can withstand heavy weight over a long service life. Such fasteners are made of thick durable metal, which is marked as “reinforced”.
In addition, you can purchase legs that have height adjustment, which will further facilitate the installation process. This element will be indispensable when you need to hang a cast-iron radiator on.

For other radiators, similar fasteners are used, but made of thinner metal. For batteries of this type there are also special racks, thanks to which you can fix to the floor.
Wall Mount Radiators
In this chapter we will make a theoretical wall mount of aluminum radiators. This manual applies to almost any type of radiator, as amended by the design features and weight of the product.
Subtleties of mounting the battery

First of all, in order to ensure the most comfortable conditions for installation, you need to familiarize yourself with the type of heating system. So, with a one-pipe connection, a bypass is required, with which you can shut off the water flow without disconnecting the entire riser from the heating. Otherwise, you will need to coordinate your actions with heating systems, the installers of which will be able to turn off the central heat supply.
If we are talking about connecting the entire system in a private house, then you do not have to worry about this.
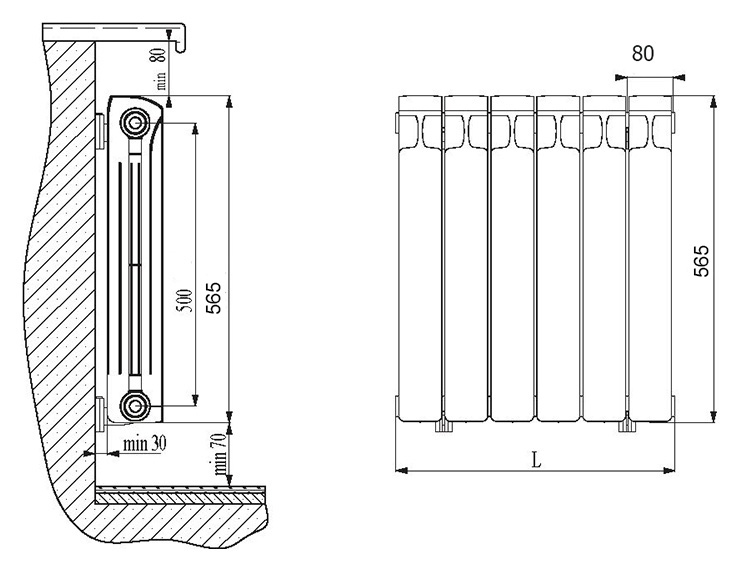
The above diagram shows how to properly position the battery in space. These recommendations are necessary for the organization of normal heat transfer, and are regulated by building codes.
- So, the minimum distance of the lower edge of the radiator from the floor should not be lower than 70 mm;
- The indentation to the windowsill is maintained approximately equal to the previous indicator - this ensures uniform air circulation;
- The distance from the radiator to the wall is 30 mm.
Radiators must be installed on brackets, the number of which must be at least three, which allows to ensure the immobility of the structure.
Advice! Do not hope that the lower part of the radiator is fixed by the position of the pipe. When pressed, deformation will be experienced by both of these elements - and this is extremely undesirable.
Before installation, part of the wall behind the radiator must first be puttied (see), and if necessary painted, since after installing some battery models, access there will be limited.
Procedure for mounting the radiator
Before starting installation work, in addition to the battery, make sure that there is a Mayevsky tap, plugs, plugs (these elements are supplied with the radiator, or sold as separate sets), brackets, taps and dowels. From the tool, prepare the building level, puncher, tape measure and pencil.

We start with the assembly of the radiator, which is performed on the floor:
- If necessary, you can increase the number of sections. For this, special nipples are used, in the center of which gaskets are installed.
- The nipples are slightly screwed onto the radiator leads, then additional sections are brought to them, after which, using a special key or chisel 22 mm wide, the elements are pulled together (see photo above). This is done in stages and in order to prevent a strong skew of the elements relative to each other, from which the nipple can jam.
- Lay the radiator in front of you with the front side. At the four corners on the sides, it has conclusions for connecting valves and other elements. The thread applied to these findings is different: on the right, it is right, and on the left is left.
- The plugs (adapters) supplied in the kit also differ in the direction of the thread. On the right is the marking “D”, and on the left is the “S”. Sort them and screw onto the radiator.

- When assembling the radiator, it is most convenient to use a special key on which there are all the necessary holes. Tighten the plugs with it, but do not overdo it so as not to squeeze the silicone gasket out of the joint, which must be mandatory.
- Next, see which side the pipes will connect to the battery. With a lateral connection, a cap and a Mayevsky crane are screwed onto opposite terminals. You can install them in any order, but for better bleeding air from the system, it is recommended to place the Mayevsky tap on the top terminal of the radiator.
- With a lower connection, the tap and plug are placed on both upper terminals.
- Then carefully tighten both of these elements.
- Now, on the remaining conclusions you need to wind the adapter under the tap, which is called "American". This element has a movable union nut, with which the structure is tightened.
- Everything, the battery is ready for installation.

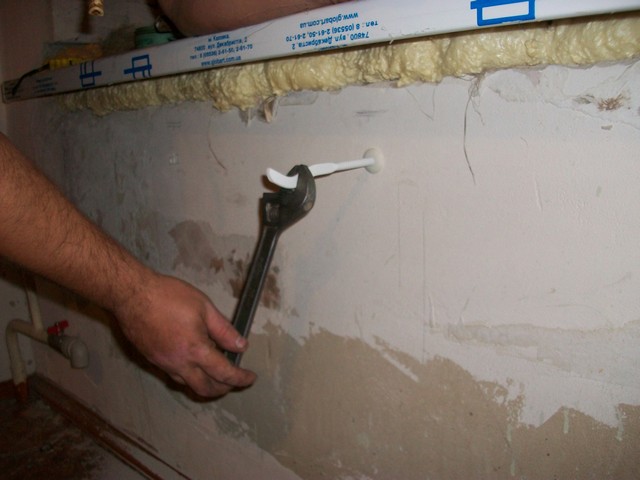
In order to ensure that the battery is positioned exactly at the level after installation, we must take the correct measurements and accurately drill holes for the fasteners, avoiding the displacements of the drill.
- Measure with a tape measure the distance between the sections in which the brackets will be located, as well as the height of the seats relative to the top edge of the radiator, and write it on a piece of paper.
- Transfer the dimensions of the radiator to the walls, focusing on the heating pipes, at the ends of which the cranes should already be wound. With their help, you can shut off the heating supply in the future.
- Make a mark under the first hole, and using the level and previously obtained measurements, find the exact position of the second and third.
- Also, measurements can be made in fact, after having screwed the radiator. But in this case you need to be extremely careful, and most likely, you will need the help of a partner.
Advice! In cases where corner brackets are used, there is no overhang adjustment, so we recommend the use of pin brackets.
Now, all you have to do is put the battery on the brackets, pull off the crane and the American between you, and conduct a test run of the system to make sure that the connection is made securely.
What to do when attaching radiators built into the wall? The whole procedure is exactly the same as described above. In this case, the radiator grille will hide the battery from view, so that during installation it is possible to allow minor errors in the arrangement. It is advisable to install a heat-reflecting screen behind the radiator in order to redirect the heat rays going into the wall to the center of the room.
On this, the fastening of the heating radiator to the wall can be considered completed. Of course, it is difficult to describe in words the entire installation process in detail, so we suggest watching the video in this article so that you can see everything clearly.
In a radiator heating system, heating appliances are traditionally installed under window sills. In exceptional cases, the design may provide for a different arrangement of radiators. To fix heating devices in selected places, special brackets for heating radiators are used, manufactured by manufacturers in a large assortment. Fasteners suitable for aluminum or bimetallic devices are not suitable for cast iron batteries, which have significant weight and solid dimensions.
Various types of wall and floor fasteners for radiators
Criteria for choosing fasteners
The choice of fasteners is made taking into account the main technical characteristics of the mounted heating system, as well as the features of the room in which the installation work is performed. The following factors play an important role:
- battery material;
- overall dimensions of heating appliances;
- building material used for walling;
- sizes of window openings, their number in the room and location features;
- design project of the interior of the room.
Having objectively assessed all of the above factors, one can correctly choose fasteners, as well as calculate their number.
Wall mounted radiator mount
This method is most widely used in the practice of installing heating systems. For direct mounting of heating devices to the bearing wall of the room, angular and anchor fasteners are available.
Important! When choosing a bracket, the following rule is followed: the heavier the radiator, the greater should be the thickness of the fastener. In addition, the materials for the manufacture of fasteners and batteries must comply with each other.
Cast Iron Battery Fasteners
For massive cast-iron radiators, which differ in weight from other heating devices, several types of fasteners are used:
- cast iron holders;
- adjustable steel fasteners that allow you to adjust the distance between the battery and the wall while aligning the device in height and a strictly horizontal location;
- steel pin brackets;
- holders on a steel strip, etc.
For standard fastening of cast iron batteries to concrete and brick walls, any standard fasteners are suitable. Wall mounting of these heating devices on wooden or plasterboard walls should be accompanied by reinforced floor fixing. In this case, they additionally purchase a floor bracket for the radiator, which is designed to take on the bulk of the load.
Fasteners for aluminum and bimetallic devices
Other brackets for bimetal heating radiators and their aluminum counterparts will be needed. These heaters are much lighter than their cast-iron counterparts, so it is suitable for their fastening:
- steel corner fasteners (simple or reinforced model);
- steel round or molded pin bracket with a dowel, the length of which varies between 120-170 mm;
- universal wall fasteners with plastic overlay, etc.
Important! Manufacturers of radiators usually supply special fasteners that are ideal for a particular radiator model.

Round pin brackets with dowels for aluminum radiators
Floor mounting method
This mounting option is resorted to much less often than the wall. This installation method is chosen either for reliability and safety (in the case of "fragile" walls), or at the request of designers. Floor fasteners are presented as:
- fixed brackets, sometimes they are equipped with a plastic overlay;
- adjustable devices, sometimes also bundled with a plastic pad;
- combined floor fasteners;
- special floor brackets with a width of 80 or 100 mm.
Important! Manufacturers offer small legs for some radiators.

With two floor brackets, the radiator is firmly attached to the base
How is the number of fasteners calculated
Find out how many brackets you need for a radiator, you can from the technical documentation governing the construction and installation works. When installing cast-iron batteries, they are guided by the rule according to which: on a device that includes more than two, but less than nine, sections, three wall brackets are needed. Two fasteners support the heater from above, and one from below. Universal kits are sold for aluminum and bimetal radiators, including three saber pin brackets that come with the same number of dowels.
![]()
Mounting the molded pin bracket to a predetermined location
When installing batteries on floor stands, the calculation of the latter is as follows:
- two floor holders for the battery with the number of sections not exceeding 10;
- three holders for devices, the number of sections in which exceeds 10.
Important! For heating appliances supplied by manufacturers complete with fasteners, the number of the latter is determined by the manufacturer in accordance with applicable standards.
Choose the bracket for the heating battery and independently install it under the power of each person. Those who are accustomed to trusting the work of professionals will not have to worry about installing the fasteners, since the entire installation of the heating system will be undertaken by a team of specialists.
Video: how to mount heating radiators
When installing or replacing batteries yourself, it becomes necessary to select related equipment. One of the fasteners is a bracket that allows you to securely fix the heating radiator and thereby ensure the integrity of the entire system. The latch is a galvanized steel hook with a round or rectangular cross-section, at the other end of which there is a mounting plate or thread.
The right choice of brackets is very important, because you can not allow the equipment to once sag, collapse from a sudden seismic activity or from an accidental impact.
Types and use of radiator holders
Batteries are made of copper, aluminum, cast iron and bimetal (their inner layer is made of steel, the outer one is aluminum). They are either suspended from the wall, or rely on floor installations, it is possible to combine these options. Some fasteners can be adjusted in height, length. There are many types of brackets, divided into 2 large groups:
1. Wall mounted:
- pin (anchor) fixed (short and long) holders for bimetallic or steel radiators;
- height-adjustable (range of changes of about 20 mm) with a mounting plate, allow you to hide installation errors, surface irregularities or hang out perfectly horizontally batteries with a large number of sections (more than 6);
- corner - for small or light heating elements.
There are also anti-noise holders with a special coating (rubberized). Technical characteristics of this bracket for mounting radiators: material - steel, diameter - 7 mm, withstand weight up to 82 kg. They are usually taken for bedrooms, so that you can not hear a slight tapping that occurs in the equipment when heated.


2. Overview of the brackets for attaching the floor radiator.
They are in the form of:
- an independent stand with a sole, it is used for massive structures that are impractical to suspend, for example, near too thin (drywall) partitions or display windows;
- additional for batteries bolted to the wall - these are the most suitable brackets for cast-iron radiators;
- racks with hooks that can be screwed to the floor and to the wall; It is also intended for overall equipment, but it is used to distribute the load between the planes (for example, in a wooden house).
Floor holders can also be height adjustable. There are options:
- in the form of a stand without fixing the radiator;
- with additional retaining elements: with a chain or clamp;
- on the sole or on a tripod, can be screwed to the floor or simply placed on it.

How to choose the right bracket
The main rule when buying a latch: it must withstand the weight assigned to it. The maximum load is usually indicated in the attached instructions. It is easiest to choose a bracket for an aluminum radiator, since it weighs little and any type is suitable for it.
For very powerful batteries, take the floor stands. But if the coating in the house is wooden, then you need to make sure that the latches are equipped with additional fasteners to the wall. This is necessary in order to reduce the load on the boards. For lightweight heating elements, which will be located in a deep niche under the window, it is better to buy a long bracket.
It is recommended for cast iron radiators to take holders with the ability to slightly change the height, otherwise there may be difficulties with installation. The price of the adjustable bracket is not so high as to abandon the convenience of installation.
It is important that the alloy does not contain toxic substances released during heating. You should not buy parts from hand, especially without the corresponding supporting documents. Please note that the lightest - the corner bracket - is only for aluminum and copper radiators.
| Mark | Production | Specifications | Price, rubles / pcs. |
| Omec | Italy | fixed, wall-mounted, anti-noise, steel, up to 70 kg, anti-corrosion galvanization | 130 |
| Konner | China | floor, to strengthen the bottom of the radiator, uncoated steel, up to 100 kg | 255 |
| Royal thermo | Italy | for bimetallic batteries, adjustable in the range of 2 cm, up to 70 kg | 170 |
| Tiarun | Russia | anchor, made of galvanized steel, painted with epoxy enamel, length 170, 220 and 250 mm, up to 150 kg | 35, 50, 70 |
| 08ps - GOST1050-88 | corners, made of sheet steel, covered with powder enamel, according to the description, the weight of the bracket is only 52 g / pc., designed for aluminum radiators, up to 50 kg | 25 |
How to do it yourself
First, markup is done according to the following rules:
- the distance to the floor and window sill should be about 100 mm;
- for every 6 sections, 2 brackets are placed on top and 1 on the bottom.
Installation of clamps is simple:
- holes are drilled in the concrete wall, dowels are inserted and threaded holders are screwed into them;
- in a brick - the junction is additionally strengthened (hidden) by cement mortar and awaits its solidification;
- fasteners with a special plate are screwed to a wooden surface with the help of nuts;
- if necessary (for cast iron batteries), a stand is installed on the floor, carefully screwing it;
- all holders are checked for reliability by trying to rotate or slide them manually.
Then the radiator is hung on the brackets. After that, the structural strength is again tested.
One of the important aspects of the installation of elements of heating systems is the installation of the battery on the wall. At first glance, the elementary questions - how and how to fix this device on a vertical surface, are not so unambiguous and therefore deserve special attention. This is what we will talk about in this article.
Radiator mounting
Instructions for connecting devices to the piping system and fasteners for heating radiators to the wall depend equally:
- Battery Typeselected for heating.
- Material from which load-bearing walls are erected, because it is on them in most cases that these products are fixed.
Those who decide to do the creation of a heating system with their own hands should thoroughly understand this issue.
Types of heating device and features of their installation
Classical fastening of batteries is carried out on the wall under the windows for the thermal barrier to cool air coming from the glazing. The selection of the type of fastening is carried out taking into account the mass of a particular heating product.
Cast Iron Models
Cast iron batteries are the most weighty of all known heating appliances.
Moreover, they have a number of undeniable advantages that explain the popularity of cast-iron heating products:

- Thick-walled sections of such an aggregate hold heat well and give it to the room for a rather long time even when the coolant supply is turned off.
- Cast iron is highly resistant to corrosion and therefore radiators made of this material are as durable as possible.
The disadvantages of cast iron appliances include their large weight and considerable massiveness. However, modern manufacturers have learned how to make rather elegant products from this material, not only warming the room qualitatively, but having aesthetically attractive shapes.
Mounting cast-iron radiators to the wall is carried out in various ways:
- For walls made of brick, cinder block, concrete, it is possible to fasten using simple brackets or bent pins made of thick metal on simple dowels.

- For wooden walls and drywall constructions, it is necessary to build a floor base, which will have the main load. And the fastening of cast-iron radiators to the wall will perform a supporting function.

To work on installing a heater, you will need:
- Drill or hammer drill with attachments appropriate to the wall material.
- Building level.
- Brackets.
- Dowels.
The rules for fixing the heating radiator to the wall are common to all types of appliances:
- The distance from the top of the device to the windowsill is about 100 mm.
- From the floor to the bottom surface of the battery -100-120 mm (this is especially important in cases where you have a “scrupulous” floor covering).
- From the wall to the battery 30-50 mm.
Important!
When these parameters are changed, the heat transfer of the heating device is significantly reduced.
- The number of mounts is calculated according to the dimensions of the battery (at least two mounts at the top and one supporting at the bottom). This is for a six-section radiator mounted on a concrete or brick surface.
- For sectional devices, the brackets are located between the sections.
- Marking for fastenings is carried out in compliance with the vertical and horizontal of the future product (use the level).
Attention!
It is necessary to provide a slight horizontal slope to prevent the accumulation of air bubbles in the upper part of the product.
- Strictly ensure that the inlets on the battery are located accordingly to the heating main.
The instruction for the workflow is very simple, so anyone can do this work with their own hands:
- The marking of the battery mounting points is carried out with a simple pencil using the building level and ruler.
- Further, holes of the desired diameter are drilled in the designated places.
- Dowels are inserted into them, into which the brackets are then screwed in, they must be securely fixed (fixed).
- It's time to try on the battery. If all the hitching rules of the device are observed, and it is well fitted on the mounts without reels, you can continue mounting the radiator to the wall - fix it with.

Steel radiators
Steel heaters:
- Much less massive, which greatly facilitates their installation.
- They warm up very quickly and begin the process of heat transfer.
Steel batteries are sectional and panel. Sectional models are hung, like their cast-iron counterparts, with the only difference being that the bracket for attaching the radiator to the wall is less powerful.
For fastening panel products on the rear wall, brackets are welded, which are hung on the brackets. The number of brackets depends on the size of the panel (at least four pieces).
Advice!
The marking for must be performed with extreme accuracy so that the welded staples easily hit the mounted brackets.
In addition, the surface of the wall must be perfectly aligned.
With a small mass of fasteners, heating radiators to the wall can be facilitated and performed using a set of special brackets and stops. With this method, the upper hinges of the device are hung on the brackets, and the lower one is fixed in the device, which rests either on the floor or in the wall (more often).
Note!
In this way, it is better to mount the heating radiators to the wall of aerated concrete.
Aluminum radiators
Aesthetic and neat aluminum models:
- They have a beautiful appearance.
- A very small mass, which makes fastening aluminum radiators to the wall quick and easy.
- Designed for operating pressure in the system up to 20 bar.
- They are characterized by a maximum heat transfer rate.
Unfortunately, aluminum heating appliances are prone to corrosion and quickly collapse at junctions with other metals.

Bimetal radiators
Truly, the universal type of radiators is bimetal heating devices:
- Combine the best qualities of steel and aluminum batteries.
- The fastening of bimetallic radiators to the wall is light and simple.
- The steel inner surface of the product reduces the risk of damage due to corrosion.
- Bimetal radiators are designed for the optimal pressure level in heating networks.
Interesting!
When choosing heating appliances, professionals advise to opt for bimetallic products.
Before fixing the bimetallic radiator to the wall, marking is performed in accordance with the dimensions of the device. Fastening to stone and concrete walls is carried out on brackets by analogy with the technology described above.

For structures made of drywall and other lightweight materials, you need to use double-sided fasteners.
If you still have doubts about the reliability of fastening the radiators to the walls so that they do not sag under their own weight, purchase and install floor stands. They will help to distribute the mass of the device and partially relieve the load from the wall mounts.
Conclusion
Now you know how to fix the heating radiator to the wall without any difficulties, unless, of course, you have all the tools necessary for this process. But this is not a problem, since there are stores that provide tools for rent, if you do not want to buy a hammer, and yet you can not do without it.
The price of the service is low, and you can easily cope with the task in a couple of days. In the video presented in this article, you will find additional information on this topic.
Brackets - devices used when installing heating equipment. Between themselves, they differ in initial dimensions. The reason for this is the variety of radiator models - cast iron, steel, aluminum, bimetal and others. The weight of these units together with water will be different.
In general, brackets for heating radiators are divided into types:
- Adjustable. Such radiator fasteners can vary in height and horizontally. You only need to use a wrench.
- Unregulated. Mounted by means of anchor, dowel fastening, or hammered directly into the wall, where the radiator section will be located. Small displacements in height or width are allowed.
Brackets for radiators simplify the procedure for removing batteries in order to insulate the wall behind it, in this way to increase the temperature in the room by several degrees.
One of the most common difficulties in installing heating equipment is how to fix radiators on drywall? As a rule, it is solved by using the so-called angle-mounted overhead brackets. Their design is special in that it has a part bent at an angle of 90 ° with horizontally (vertically) longitudinal holes located. This design is mounted on pre-installed wall anchors, building dowels with screws, nuts or rivet bolts. After adjusting the location of the radiator battery, the fasteners tighten - heating equipment is installed.
Kimra Thermal Equipment Plant offers you brackets for radiators of our own production. The assortment range is large and it has such models as:
- White brackets;
- Pin brackets with dowel;
- Universal fasteners with plastic overlay, screws and dowels;
- Reinforced brackets;
- Fasteners on the strip H \u003d 2.5 and H \u003d 4.0;
- Floor brackets in white.
We also offer custom-made fasteners at affordable prices. We guarantee high quality and operational performance.
Prices for radiator brackets
|
APPEARANCE |
Title |
from 500 pcs |
from 5 000 pcs |
from 10 000 pcs |
||
|---|---|---|---|---|---|---|
|
|
Bracket white (analogue "ELEGANCE") |
|||||
|
|
Pin bracket |
flat white (7x180) |
||||
|
white (10x200mm) |
||||||
|
without coating (10x200) |
||||||
|
|
Universal bracket (with plastic overlay + screw + dowel) |
white short |
||||
|
white dyne |
||||||
|
|
Reinforced bracket |
white short |
||||
|
uncoated short |
||||||
|
white long |
||||||
|
uncoated long |
||||||
|
Bracket on the strip |
300/100 uncoated |
|||||
|
300/140 uncoated |
||||||
|
500/100 uncoated |
||||||
|
500/140 uncoated |
||||||
|
Bracket on the strip |
300/100 uncoated |
|||||
|
300/140 uncoated |
||||||
|
500/100 uncoated |
||||||
|
500/140 uncoated |
||||||
|
Bracket floor white |
for radiator -ROVALL, ALUX |
|||||
|
for radiator FARAL GREEN |
||||||
|
universal short for bimetal radiators |
||||||
|
universal long for bimetal. radiators |
||||||
|
for cast iron radiators |
||||||
|
for steel panel.rad. |
||||||
|
for steel panel.rad. |
||||||
|
|
Key with handle for assembly / disassembly import. radiators of all types |
up to 4 sections |
237-00b / r |
|||
|
up to 7 sections |
296-00b / r |
|||||


|
Key with handle for assembling / disassembling cast-iron radiators |
up to 4 sections |
169-00b / r |
|||
|
up to 7 sections |
218-00b / r |
* - made to order