Connection of sewer pipes in a private house. How to choose an autonomous sewer for a private house - detailed instructions
Nowadays, a house without amenities few people are happy with, despite the fact that it is located in the village. In addition to the water supply of a private house, the outflow must be used. Without the presence of basic sewage, people living in it in a country house will not have proper comfort. Nowadays, this is not a luxury, but a simple necessity. The solution to this problem may be do-it-yourself sewer in a private house, which is a completely feasible task, if you approach it with due responsibility.
Internal and external sewerage in a private house
All work on the sewage system in a private house comes down to the design of external and internal sewers. Internal sewage of the house involves the installation of riser pipes of fan pipes, wiring pipes to rooms, such as a kitchen and a bathroom. External sewage, respectively, is all that is outside the house. In particular installation of external sewage involves supplying pipes to a septic tank or to a deep cleaning station. Naturally, if it is possible to connect to a centralized sewage system, this greatly simplifies the task. But now we’ll talk about the case when you need an autonomous sewage system with effective sewage treatment, without any cesspools.
Scheme of the internal sewerage of a private house
Usually start with internal sewerage schemes. Even at the design stage of the house, you need to make sure that all the so-called “wet” rooms are closer to each other, this solution will greatly simplify the arrangement of the sewage system. Naturally, the sewage scheme is individual for each house and can look as soon as you like.
When arranging drainage from toilets, it is recommended to use pipes with a diameter of 10-11 centimeters, and their total length was one meter. And for the so-called gray drains that enter risers from kitchens or bathrooms, pipes with polyvinyl chloride or polypropylene with a diameter of 50-55 millimeters are used. And in order to minimize the risk of sewage blockage during its operation, it is recommended that all network turns be performed due to two bends bent at an angle of 45 degrees. For the arrangement of sewage it is better to buy polyvinyl chloride or polypropylene pipes; they are much cheaper and more durable than cast iron or steel. In addition, the installation of internal sewage with their help is much easier and faster.
It is very important to correctly determine the location of the riser or collector pipe. And already from this to make the layout of sewer pipes.
Let's talk in more detail about how to properly develop your own sewer scheme in the house. After all, with a well-developed circuit, you can already objectively judge how many materials you will need for a sewer device. Of course, we will draw the sewage scheme on a sheet of paper with a pencil, you will also need a tape measure and a ruler.
The sequence of works on drawing up a scheme for future sewage in a private house:
- To begin, make a plan of the house on a scale;
- Determine the position of the risers;
- In accordance with your capabilities and needs, depict plumbing fixtures (knowledge of how to connect them is important here);
- Then on the diagram depict on the plan a pipe from plumbing fixtures to a riser and all the connecting elements, namely bends, tees and the like;
- All these operations need to be performed for each floor of the house separately;
- Decide on the parameters of the fan pipe and riser;
- Next, summarize the lengths of all sewer pipes, taking into account the release;
- Now we are talking about the arrangement of the internal sewage system and create its scheme, but still we need to do something with the drains, so we proceed to the next step - designing the external sewage system;
- Make a diagram of the external sewerage of a private house, which includes all pipes from the outlet, and then to the septic tank or the deep cleaning station.
Sewer pipes
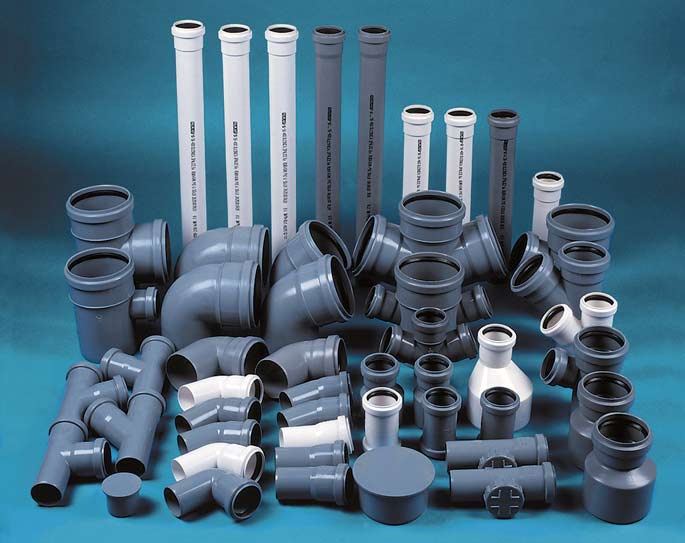
Depending on the conditions under which the pipes will be used, manufacturers offer products for external and internal sewerage. For example, for laying internal sewage, pipes with polyvinyl chloride or polypropylene with a characteristic gray color are preferable. Namely, pipes with a diameter of 10-11 centimeters used for risers or deckchairs and pipes with diameters of 5-4 centimeters for the removal of so-called "gray" drains from plumbing fixtures. But this is only for wiring the internal sewage system, and for the external sewage system, completely different ones are used.
Typically, pipes designed for routing external sewers have a characteristic orange color. This is explained by the fact that in the earth such a color is more noticeable than others. But these pipes are determined not only by one color - to the material from which they are made completely different requirements. For example, the stiffness of pipes for external sewage should be very large, since they have to withstand a considerable load from the ground. There are even more rigid products, for example a corrugated two-layer pipe. But it is unlikely to be needed for an external sewage system in a private house, because the depth of the pipeline laying usually does not exceed two meters. Therefore, you do not need to worry for an adequate drainage from a private house, a standard orange pipe with a diameter of 11 centimeters is enough.
Characterization of sewer pipes
Let us consider in more detail the advantages and disadvantages of popular pipes used for laying sewers in private homes:
| № | A photo | Name | + | - |
| 1. | 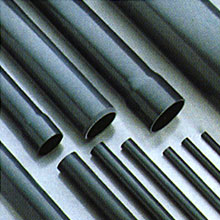 | Cast iron pipe | strong and durable, able to withstand huge loads | fragile, heavy and expensive; due to the corrosion property, the inner wall of the pipe becomes rough, which can cause blockages, then no one knows what to do if sewage is clogged |
| 2. |  | Polypropylene pipe | flexible and lightweight, which makes it the most popular when installing internal sewage (usually a pipe of a characteristic gray color); tolerates high temperature of sewage | when used for its intended purpose is not observed |
| 3. |  | PVC pipe | strong and durable, able to withstand huge loads; lightweight and inexpensive. Usually used for laying outdoor sewers, easily recognizable by the characteristic orange color | poorly tolerates high temperatures of sewage; more likely to crack than bend (you can say - fragile) |
Pipe laying
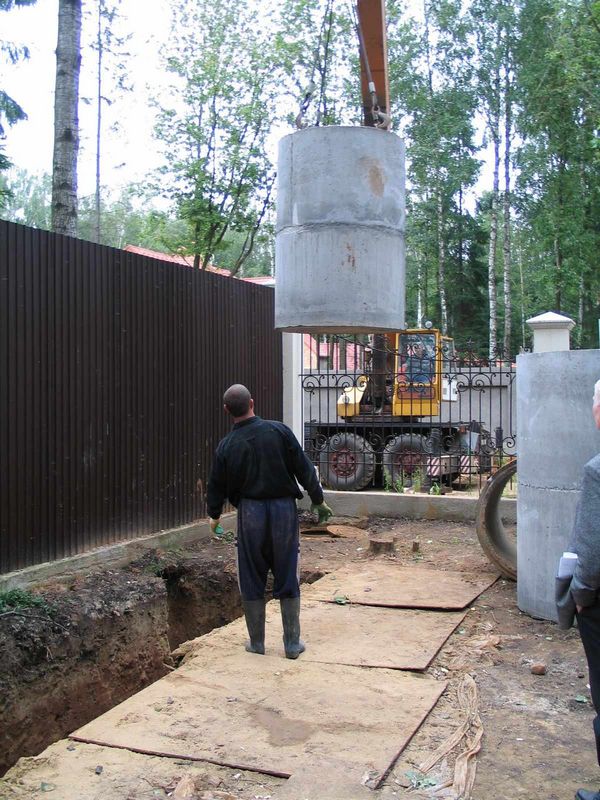
Probably the most labor-intensive process in arranging sewage for a private house is the laying and wiring of sewage pipes. If you decide to do this on your own, then a lot depends on it and maybe you should think about using at least one assistant. Because not only speed depends on this, but also the quality of the work performed. Let's run a little ahead: we advise, before starting the full operation of the sewage system, to make a preliminary check of its tightness by spilling with clean water.
Sewer pipe connection
As mentioned earlier, the simplest and cheapest method involves the use of polyvinyl chloride or polypropylene pipes. On the modern construction market, you can easily find plastic elbows, tees or revisions with special rubber cuffs in the connecting places thanks to which they connect easily and reliably. And for even greater reliability, the joints can be further treated with silicone-based sealants. In places where pipes pass through floors or walls, it is imperative to install sleeves.
It is worth talking about the slopes of the sewers. There are international standards according to which it is clearly clear that the angle of inclination of sewage pipes in pressure-free systems depends on their diameters. For example, for pipes with a diameter of 5 centimeters, the slope should be 3.0-3.5 centimeters per meter of laid pipe; for pipes with a diameter of 10-11 centimeters, the slope should be 2.0-2.5 centimeters. Take these indicators into account when laying sewer sewers in a private house yourself.
Sewerage Issue
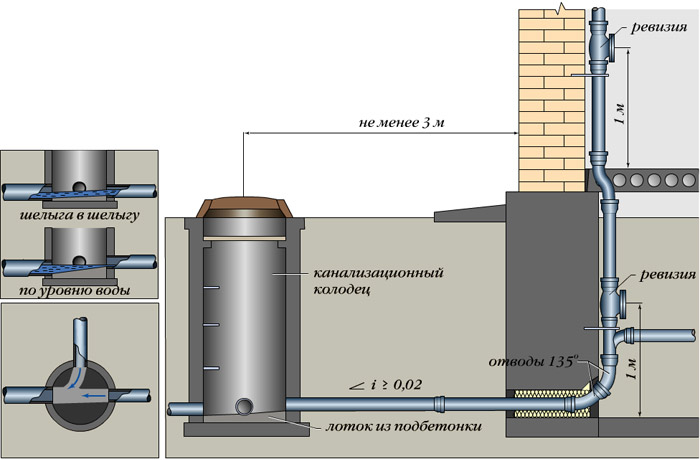
Sewerage release will ensure that there are no problems with the mismatch between internal and external sewage systems. Therefore, even if it is worth starting sewer system installation yourself, then you need to fix it from the release. If you do not know what the outlet is, then this is the border part of the sewage system, which connects the riser (exit from the house) with a pipe leading to a deep-water well or to a septic tank.
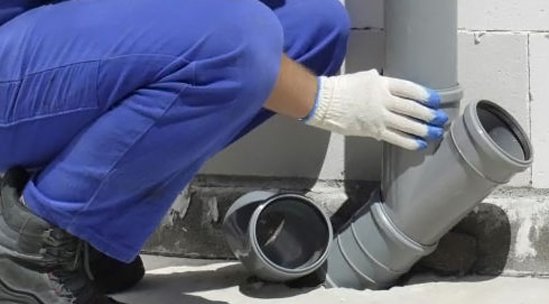
The outlet is mounted through the thickness of the foundation at a depth of about one meter, that is, the depth of freezing of the soil. Of course, it can be higher, but only if the pipe is insulated. This is necessary to the sewer did not freezein the winter. Anyone who could use the toilet only in May, when the sewer thawed, will tell you that you should not neglect these conditions.
If the foundation was flooded even before planning for the availability of sewage, then you will have to punch a hole in it, of such a size that it is possible to install a sleeve in which the outlet pipe will pass. A sleeve is nothing more than a piece of a rough-wall pipe with a diameter of 140-150 millimeters. A large diameter is needed in order for the sewer pipe to pass with a diameter of 100-110 millimeters. The size of the sleeve depends on the thickness of the foundation plate, namely such that the edges of the sleeve protrude 15 centimeters from both sides.
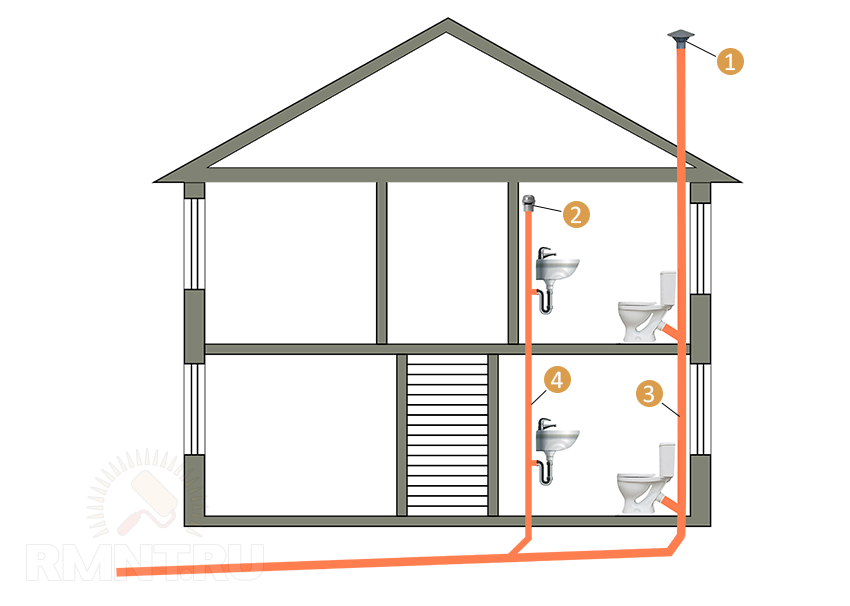
Installation of a riser and wiring of sewer pipes of a private house

If you take into account the recommended size of the sewer pipe going from the toilet to the riser, and this is 1 meter, then the riser should be located in the toilet. You can make the installation, both open and hidden, it all depends on where the pipes go; it may be some special niches or boxes, or it may be that the pipes pass just next to the wall.
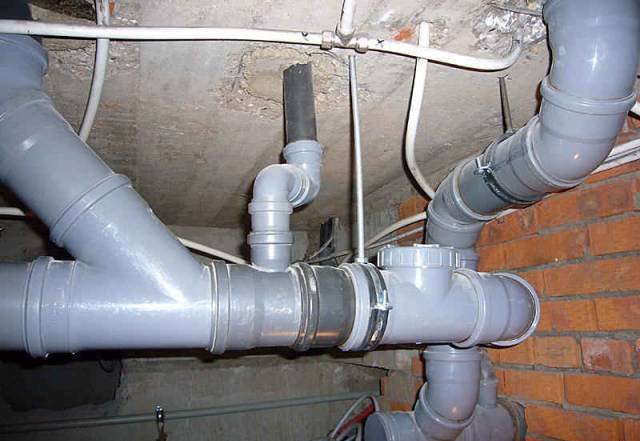
To connect the sewer pipes to the riser, use special oblique tees, and the connection of pipes of different diameters is carried out using special adapters. In all places where the sewage pipes of the so-called gray drains intersect, for example, from the sink, shower, bath, collector pipes with a diameter of 10-11 centimeters are installed. The main thing is not to forget to install the so-called hydraulic locks, thanks to which you will protect yourself and your loved ones from the smell of far from pleasant scents of the sewer.
Important! On each floor, a special tee is mounted in the riser - an audit, thanks to which you can clean the sewage blockage at any time if necessary. This is a prerequisite. But many experts advise installing such a revision after each turn of the pipe.
Fan Pipe Outlet

A very important and responsible role is assigned to the installation and withdrawal of the fan pipe. Such a pipe will serve:
- For ventilation of the entire system, it is very important that the septic tank works efficiently;
- To increase the durability of the effective operation of the system;
- To support internal atmospheric pressure, which in turn avoids air discharge and water hammer.
Theoretically, a fan pipe is a continuation of the riser. The pipe is connected to the riser, a revision is installed and displayed on the roof of the house.
Important! God forbid, combine sewer ventilation with a chimney, or even worse with your own ventilation at home. In addition, the outlet of the fan pipe should be made as far as possible from the balconies, windows of the house and with an indent from the roof of at least 70 centimeters. Again, the exits of the chimney, ventilation of the house and sewer should be located at different levels.
To summarize the above:
- At the first stage, we made a detailed diagram of the pipe layout in such a way as to minimize the distance of plumbing fixtures to the riser or risers;
- The size of the diameter of the sewer should only increase as each of the plumbing fixtures is connected, but in no case vice versa;
- The main thing to remember is that all devices with a large outlet should be located closer to the riser, but the toilet should be closest;
- There should not be any sharp corners in the wiring of the sewer in a private house, and all pipes should be laid at the appropriate angle in the direction to: a septic tank or a sewage treatment plant;
- In all places where blockages are suspected to occur, revisions and cleaning should be installed;
- Be sure to include a background pipe to ventilate the entire system.
External (external) sewage network
It is very difficult to overestimate the importance of the outer part of the sewer of a private house. And if you want to fully use the water you need to take care of its purification. Of course, you can buy a ready-made sewage treatment plant or a stand-alone installation, for example septic tank, which has pretty good reviews. But you can do it yourself septic tank, significantly saving on this. The device of an external sewage system must be treated no less responsibly than the design of an internal sewage system. The question of your comfort depends on this, but also the potential penalties of environmentalists or even your relationship with your neighbors in the site. The slightest mistake and the local external network will become one big stinking problem.
Scheme of external sewage of a private house
The device of a septic tank of a settling type - consists of a tank or their combination, in which heavier sewage inclusions settle. Then, the effluents are cleaned in the filtering field or well, where biological treatment also takes place along with the mechanical treatment of the effluents. There is another option - a storage septic tank, when only one tank is used, the larger the better, but in this case it will be necessary to periodically drain the wastewater using a cesspool machine. This method is much easier to install, but that's all its advantages and amenities are over.
We calculate the desired volume of a septic tank for a summer house or a private house

The volume of the septic tank is calculated on the basis of three-day sedimentation at an average flow rate of 250 liters per person (can be calculated individually). For example, if 3 people live in a house, then the volume of the septic chamber should be:
3 x 250 x 3 \u003d 2250 liters or 2.25 cubic meters.
Accordingly, if more people live in the house, then a larger volume of the septic tank should be.
Stages of making a homemade septic tank

Take full responsibility for choosing the location of the septic tank in order not to regret your decision in the future because, for example, in this place it would look best barbecue or a playground.
Starting to install the sewage system with your own hands, you will have to stock up not only with patience and strength, since you will have to dig more than one cubic meter of land, but also read a lot of literature on the competent arrangement of sewage in a private house, you can even take the advice of a specialist. However, “possibly” in the end result, you will have another reason to be proud of yourself when you or your loved ones take a jacuzzi or shower. It doesn’t matter if it is a brick or a wooden house - the sewer system everywhere works on the same principle.
Video: DIY sewage
The dream came true, you built a house! But, the question arises of how to lay down the sewage system in your house - it’s correct that it does not become clogged and does not bring conveniences. A properly laid sewage system is the key to success. With the help of this material you can independently install the sewage system in a private house. Follow our tips.
Stage: 1
At this stage, a plan is drawn up. The quantity and features of the desired material, installation tool are calculated. You will need: pipes, adapters, turns, bends, sealant, mortar, a level of 2 meters. mallet, piece of board, any oil, hammer, shovel, pipe fasteners.
Stage: 2
 At the beginning of the second stage, we will think over the diameter of the internal pipes for wiring in the house. It is better to take plastic pipes, it is easier to work with them. For a two-story house, the best option would be to take a pipe with a diameter of 150 mm for the riser. The riser is going from the bottom up, the bell of the pipe should look up. It is desirable to place it in the dignity nodes directly in the corner, if there are no specially prepared mines. The place of grabbing under the pipes, in the future it is worth laying with a solution. The pipes themselves can be wrapped with soundproofing material and give an aesthetic appearance.
The riser should be vertical without slopes, it cannot be connected with different pipe diameters. The connecting nodes must be aligned and they are in a horizontal position. Installation of transitions from vertical to horizontal discharge, in place of the transition node use a connection with an angle of 45 degrees. Then less load will be given from the pressure of the water merging under the pressure of the water onto the pipes. From the sinks and baths, pipes with a diameter of 50 mm are carried out. Pipes leading to the riser should be at slopes of 2-3 degrees per meter of pipe. All pipes are fixed with clamps of a special size.
 After the internal wiring is completed, we do a tap from the riser. We take a punch and make a hole of the desired diameter in the foundation, in our case the diameter will be 150 mm. This will be our zero with respect to the plane. After installing the pipe, the gaps between them must be filled with a solution.
Stage: 3
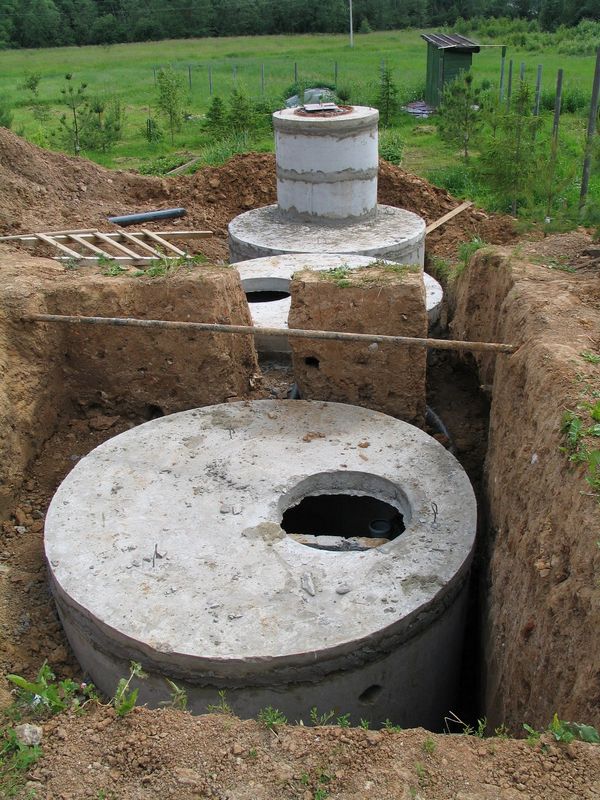
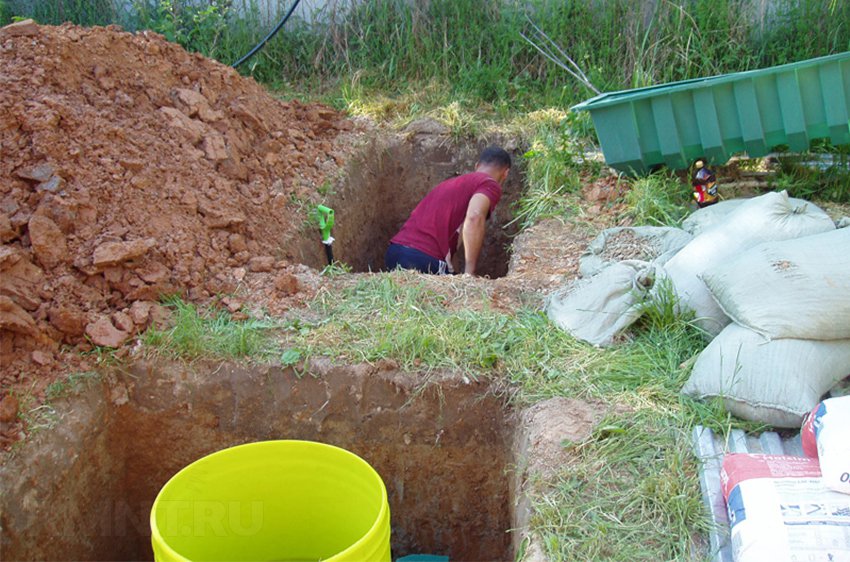
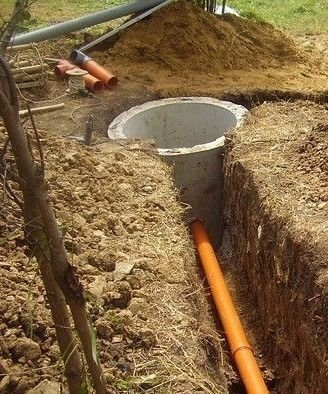 After two completed stages of installation of sewer pipes, you should already have a pre-prepared sewage pit, or septic tank, where human vital substances will fall. Concrete rings must be laid in the pit and the bottom must be closed. The depth of the pit is calculated based on the norms of water consumption and the use of sanitary appliances. A trench drips from the pit to our sewer exit from the foundation, 50 cm wide for convenient use. The depth of the trench is taken from the climatic conditions of the region (from 0.5-3 meters). Bricks, stones should not get into the trench, there should not be sharp drops in depth. All this is done so as not to damage the sewer pipe. If your trench from the house to the pit is more than 15 meters, this will lead to frequent blockages. Try to withstand 3 degrees pipe slope towards the pit. Less than three degrees will lead to stagnation of substances in the pipe and further to blockage. A slope of more than three degrees will give acceleration to water, and solids will remain in the pipes, which will also lead to further blockages and inconveniences. With a grade of 3 degrees, you will allow wastewater and solids to move at the same time. The sewage pit is located less than 5 meters from the house, then you should not worry about the slope, the larger it is, the better the sewer waste from your house will pass.
Hydraulic calculation and slope of the sewer pipe.

Slope and diameter of sewer pipes in a private house

Remember, when excavating, it is necessary to consult with gas and electric services. It can even save your life! Protect your health and the health of others! Observe safety precautions!
Stage: 4

We begin to connect the pipes from the side of the house. Docking them will be easier by lubricating the rubber bands and sockets with oil, the oil can be any, whether used motor. When laying pipes, try to have fewer turns. Adhere to a slope of 3 degrees for each meter of pipe. This is best done with the help of a 2-meter level. Here you are on the verge of making a hole in the concrete ring of the sewage pit. Take a hammer drill and go for it. After you close the gaps around the pipe in the ring and you can check the water drainage from the house. If everything works, you can dig trenches with pipes. Pipes can be insulated in cases of freezing of the earth. Try to keep the pipe protrusion in the well as small as possible, this will give you a place to work in this well in the future.
Today, in any home, the availability of various amenities, one of the most important things, even in houses that are in the village. In addition to the usual water supply, it is necessary to create a reliable sewer system. People living in a private house will not have adequate comfort without a sewer. It is not a luxury, but the design is actually necessary for life, if you competently approach the matter, then making it yourself will not be too difficult.
External and internal sewerage
 The device of the sewer system in your home consists in designing the external and internal sewer network. The internal sewage system consists of a sewer pipe, a riser and a wiring to the rooms in which water is passed, such as a bathroom, toilet and kitchen.
External sewers are elements of the system that are located outside the house. Its creation involves laying sewer pipes to a septic tank located on the site (filtration field or storage system) or a deep cleaning installation can be used. There is no doubt that if it is possible to collect all contaminated water and feces into a centralized sewage system, then the task of a sewage system becomes much simpler. But it is possible to create effective wastewater treatment in a conventional septic tank.
![]()
Internal sewage device
Undoubtedly, the creation of the entire system must begin with an internal sewage system. Even during the creation of the construction project, it is necessary to arrange the so-called wet rooms close to each other - thanks to this, subsequently it will become much easier to create an internal sewer system.
For reliable removal of waste from the restroom, it is necessary to lay sewer pipes about 100-110 mm in diameter. For drains that enter the system from the kitchen and bathroom, it is better to use PVC pipes with a diameter of about 50 mm. Turns of the sewer network are arranged using two elbows of 22.5 degrees, this makes it possible to reduce the risk of blockage. It is cheaper and much more reliable to use polyvinyl chloride or polypropylene sewer pipes, their cost is lower, they last longer and are more reliable than cast iron. In addition, the assembly of sewers using such material is greatly simplified.
When designing an internal sewage system, it is essential to determine the location of the collector pipe. It is more convenient to carry out system design work with the help of “check-box” sheets, but it will be much better to purchase several “graph paper” sheets. In addition to it, you will need a well-sharpened pencil, ordinary roulette and a ruler.

The sequence for creating a sewer scheme is as follows:
- we draw up a complete building plan on a scale (you can measure the house with a tape measure and use the one that already exists);
- distributed on the plan for the installation of risers;
- we conditionally depict the installation places of sanitary fixtures on all floors (at this time, it is desirable to imagine how the devices are connected);
- after this, it is necessary to draw the connection of plumbing fixtures using pipes on the plan (indicate all connecting elements, tees, bends, and other elements);
- all operations will need to be performed for each floor of the building;
- calculates the dimensions of the riser;
- we calculate the total length of the sewage pipes in the building up to the outside;
after this, you can proceed to the next stage of drawing up the plan - an external sewage system, which consists of pipes going from the outlet to the biological treatment plant or septic tank, taking into account all existing requirements set forth in SNiP 2.04.03-85 and SanPiN 2.1.4.1110-02.
Sewer pipes
Considering the conditions in which the pipes will operate, there are products suitable for the internal or external sewer system. Currently, when creating an internal sewer system, PP and PVC pipes of gray color are most often used. Their diameter in most cases is 110 mm (for sunbeds and risers), and for drainage from appliances 50–40 mm. Such pipes can only be used to create a system inside the building - for the device of external sewage, it is necessary to use products from other materials.
Orange pipes are used to lay the sewer system underground, for example, from a building to a sewage treatment plant or to a septic tank. The use of this color is explained quite simply: a bright orange color is better visible in the ground. But not only the shade of the material is distinguished by the external sewer pipes - the requirements for the material used in the production also differ. Pipes used outside buildings are more rigid, because they need to withstand a sufficiently large weight of soil. Pipes are also made more durable, for example, two-layer corrugated pipes. But during the installation of the sewage system, the laying depth of the pipeline does not exceed 3 m, and in most cases within 2 m, so there is no need to use pipes of increased strength. The most common diameter of the pipes is orange 110 mm, this is enough to reliably drain drains from the building.
The properties of sewer pipes, which are made of different materials, show only the most common solutions that are used for sewer devices.
Cast iron pipes
Durable pipes with a long service life can withstand high loads, but the material is brittle, with a large weight. During the use of products from this material, corrosion processes occur on the inner surface, it becomes rough, which causes the formation of growths and as a result of blockages.
Polypropylene pipes
Light and flexible products, which makes them convenient when laying a sewer network inside buildings. Typically, these products are gray, well withstand the elevated temperature of sewage.
PVC pipes
Inexpensive and lightweight products, used most often for the construction of an external sewage system, the material is orange. They react poorly to high temperature, the pipes are quite fragile.
Sewer pipe
When laying a sewer system in a private house, the most laborious process is directly laying and wiring sewer pipes to consumers. If you decide to do this work yourself, it is best to call for help at least one person - this will directly affect not only the speed of the work, but also its quality.
Pipe connection
It is easiest to use pipes made of PP or PVC for laying the sewer system. Currently, such products are widespread, and you can easily purchase the necessary pipes, revisions, tees and elbows, which, using the rubber cuffs installed at the junction points, are connected quite reliably and easily. Additionally, for better sealing, coat the joint with a special sealant made, for example, on the basis of silicone. In areas where pipes intersect walls and ceilings, it is imperative to insert sleeves.
Pipe slope
The relevant regulations clearly state that the angle of inclination in systems without pressure depends directly on the inner diameter of the pipes. For example, for pipes with a diameter of 50 mm, it will be necessary to make a slope of 3 cm per linear meter, for products 100-110 mm this value is 2 cm per meter. We must not forget, because you will need to place different points of the pipeline horizontally at different heights.
Sewerage Issue
If the internal and external sewer systems are at the same level, then it is best to assemble the sewer system in the building with the release of the sewer. As a sewage section, the outlet is the part of the system that is located on the border of the building and connects the pipe laid to the septic tank with the sewer outlet from the house.
Release is laid below the level of soil freezing through the foundation. You can lay this part and a little higher, if it is possible to perform high-quality thermal insulation of the sewer pipe. This will need to be done in order to prevent the freezing of sewers in the cold.
It is best to think about this during the construction of the house, when creating the foundation, otherwise it will be necessary to punch a hole of the required size in the already finished foundation, it is necessary to calculate the size of the hole so that the pipe enters with the sleeve. The latter is simple, a pipe section of 130-160 mm in diameter is slightly larger than the diameter of the pipe used to lay the sewer system. It is necessary to make a sleeve so long that it protrudes at least 150 mm on both sides of the foundation.
In principle, at this stage they simply drill a hole in the finished foundation or use what was done previously and insert a pipe with a sleeve on it. It must be remembered that the size of the exhaust pipe must necessarily be larger than the diameter of the riser, the installed sleeve as a result allows you to set the slope of the pipeline to the septic tank.
Installation of the riser and pipe routing
Taking into account the desired diameter of the sewer pipe, which must be laid from the riser to the toilet, it is convenient to place the riser directly in the toilet. It can be installed in a hidden or open way, depending on the method of pipe installation (installation in boxes, a wall, channels, or in special niches or near walls using hangers or clamps).
For connecting pipes and riser, oblique tees are used, and connections of products of different diameters are performed using adapters. In areas where sewer pipes intersect from a washbasin, bathtub or shower, a 100-110 mm collector pipe is placed. It is imperative to provide for the installation of so-called hydraulic locks. These elements will help protect people living in the house from the rather unpleasant odors that can come from the sewer.
It is important to consider that on each floor of the building it is necessary to install a revision (a special tee) in the riser, which allows you to clean the clogged pipe if necessary. To reduce the number of complex and unpleasant work on cleaning the system, it is advisable to install a cleaner after each installed pipe turn.
Fan pipe
A significant role is given to the correct installation of the fan pipe, necessary for:
- removal of gases collected in the sewer system and its ventilation, which is important for the proper operation of the septic tank;
- increase the life of the sewer;
- adjusting the pressure in the system, this will make it possible to prevent hydraulic shocks and air discharges
A fan pipe is a kind of continuation of the riser, it is displayed on the roof of the building. The fan pipe is attached to the riser, having installed a preliminary audit on it. After that, the fan pipe must be brought to the attic. You can use any convenient way to install ventilation for sewage in a private house, even with an attic.
It’s not worth it, as it may seem to facilitate your work and combine the ventilation of the sewage system with the ventilation of the house and especially with the chimney. It is necessary to arrange the outlet of the fan pipe at the maximum distance from windows and balconies (minimum 4000 mm). The ventilation outlets of the sewer, chimney and house must be placed at different levels.
We summarize the information above on the installation of sewage:
- First of all, it is necessary to develop an accurate scheme of future wiring so as to minimize the distance between plumbing fixtures and the riser;
- The size of the pipes passing to the riser should gradually increase in order to ensure the operation of additional devices. In no case should the pipe diameter be reduced to the riser;
- Do not forget about the rule: mount plumbing with a large release as close to the riser as possible. A toilet must be installed near the riser;
- The wiring of the sewage system should be laid so that there are no sharp corners, and the pipes must be placed under the necessary slope;
- In areas where blockages are possible, special cleanings and revisions must be provided;
- It is necessary to provide for the installation of a fan pipe in the wiring diagram.

External sewage system
It is extremely difficult to overestimate the need for proper installation, external sewage and treatment facilities. But if you need to reuse the water fully, you need to think about cleaning it. Undoubtedly, you can buy a ready-made septic tank or, also called such a plant, a sewage treatment plant. Or you can buy fully autonomous systems, for example, a septic tank. But it’s not difficult to make a reliable septic tank yourself, saving a considerable amount of money with this. The creation of an external sewage system must be approached with maximum responsibility. Here, the initial conditions are laid for creating the necessary comfort in your home, and it is possible to avoid possible fines from environmental services, but, most importantly, to prevent quarrels with neighbors. One even small mistake threatens that the local network will turn into a huge stinking problem.
Scheme of external sewage
In fact, any person can make a sewer network and a septic tank on their own, only minimal skills, a desire to save money and fully manage their cleaning system are needed.
The design of a conventional septic tank is one or more containers through which sewage water passes, as a result of which they are partially purified as a result of the deposition of heavy components. Subsequent cleaning takes place in a well or filtration field. Here, along with mechanical cleaning, a biological treatment reaction takes place. There are simpler cleaning methods, when only a large capacity (storage septic tank) is used for wastewater treatment, but in such a device it will be necessary to periodically clean up accumulated sediments. This design is easy to install, but these are its only positive qualities.
While planning the construction of a private house, it is necessary to complete the project of wiring and equipment for external and internal sewerage. What needs to be considered when designing a system, what equipment should include such a project, and how to perform installation are questions that we will try to answer in this article.
It is difficult to imagine the construction of a modern private house without sewage equipment. Even in old houses, you can increase the level of comfort by conducting appropriate work.
Before starting the development of the project, we recommend that you familiarize yourself with the MDS Manual 40-2.2000. This is an extremely useful collection on the development of autonomous engineering networks of a private house with a large amount of requirements, definitions, mandatory and recommended system parameters.
They may also be useful and will be useful:
- GOST 25150-82 - terms.
- SNiP 2.04.01-85 - for the development of internal sewage.
- SNiP 2.04.03-85 - for the development of external sewage.
- SP 31-106-2002, p.5 - sewerage of single-family houses.
In the text of these documents you can find and clarify controversial or doubtful points that arise during design.
Collection and analysis of initial data for design
Designing sewer networks requires some preparation, which consists in drawing up the technical specifications, even if the work is done independently. So you don’t have to redo the work several times.
List of input data to be prepared:
- Type of system: standalone or connecting. For a tie-in to a centralized sewage system, documents for the house and permission to carry out a tie-in will be required.
- With an autonomous system, you need to decide on the method of disposal (biological station, septic tank, pressurized storage, cesspool).
- Geology data: soil freezing depth, aquifer depth, location of water bodies, location and depth of a well or well (with autonomous water supply), soil data.
- Precipitation data (when designing storm sewers).
- Based on the recommendations of SNiP, calculate the peak load, depending on the number of people living and plumbing equipment. If the stay in the house is seasonal, this is also taken into account in the calculations.
- Make a floor plan with the points of drains from the bathtub, showers, washbasins, sinks, toilets, bidets, washing machines and dishwashers.
Domestic sewage design
We begin the design with the location of plumbing equipment. To reduce the length of the sewer pipes, as well as to simplify the ventilation of the system, it is recommended to place them as close to each other as possible, and when placed on different floors, one above the other. Thus, the riser is a vertical section of the drainage system, there will be one in the house. With a large area of \u200b\u200bthe house or in the case when the sewage system is carried out in an existing building, it is possible to equip two or more risers.
Domestic sewage device
All drains from individual points are cut into the riser by pipes with a diameter and slope recommended by SNiP. These recommendations make it possible not to perform hydraulic calculations in most cases. The indicated grade is the minimum. The maximum value is 15 cm / m (except for sites shorter than 1.5 m - there can be more).
Table. Required slopes and diameters of pipes for discharge
| Device | Slope | The distance between the central drain and siphon without ventilation, cm | Pipe diameter, cm |
| Bath | 1:3 | 100—130 | 40 |
| Shower | 1:48 | 150—170 | 40 |
| Toilet | 1:20 | up to 600 | 100 |
| Sink | 1:12 | 0—80 | 40 |
| Bidet | 1:20 | 70—100 | 30—40 |
| Washing | 1:36 | 130—150 | 30—40 |
| Bath, sink, shower (combination drain) | 1:48 | 170—230 | 50 |
| Central riser | 100 | ||
| Riser bends | 65—75 |
Table. Slope values \u200b\u200bdepending on pipe diameter
Pipes are bred using fittings. In this case, it is desirable that the bends did not consist of one bend at an angle of 90 °, but of two at 45 ° (or 3 at 30 °). This reduces the local hydraulic resistance, reduces the likelihood of clogging.
 Execution of bends: 1 - knee 30 °; 2 - mounting clamps; 3 - overlap; 4 - oblique tee or revision
The upper part of the sewer riser (fan pipe) is discharged above the roof level by at least 50 cm and is open for ventilation and compensating for pressure drops during the period of discharge from one or more points. On dead ends, not facing the roof, aeration valves are installed. The lower part of the riser falls below the floor of the first floor, preferably into the basement, and is discharged by a pipe of the same or larger diameter outside the house.
 Sewerage system ventilation device: 1 - deflector; 2 - aeration valve; 3 - riser with a diameter of 110 mm; 4 - riser with a diameter of 75 mm
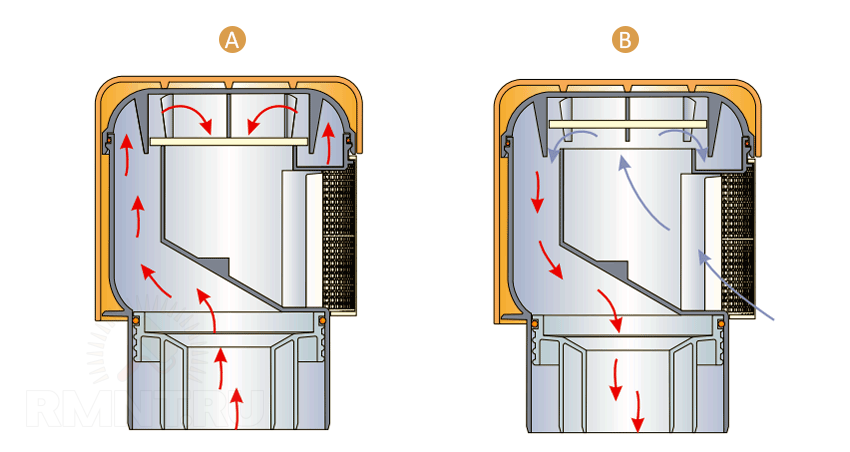 The principle of operation of the aeration valve: A - the valve is closed; B - valve open
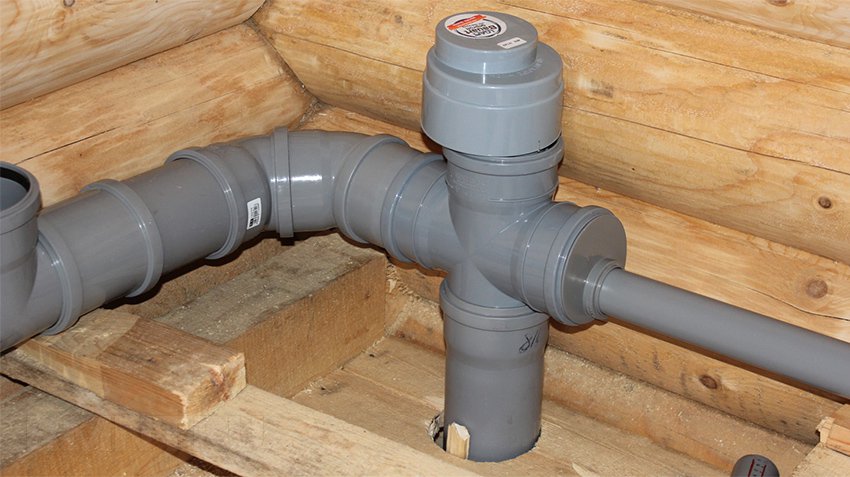 Appearance of the aeration valve
Rules for designing an internal sewage system
For the normal functioning of the system, one should strictly adhere to certain rules for the design and construction of sewers:
- The location of the toilet should be as close as possible to the riser (not further than 1 m). The drain from it must be individual, it is unacceptable to connect the drain from another source. All other plumbing fixtures on the floor, draining water into the same riser, must bump above the side of the toilet drain.
- The diameter of the drain pipes cannot be less than the diameter of the drain hole of the equipment.
- The maximum permissible length of a conventionally horizontal section should not exceed 10 m (ideally, not more than 3 m). At large distances, a second riser is organized. The longer the horizontal section, the larger the diameter of the sewer pipe should be, not less than: over 3 m - Ø 70 mm, over 5 m - Ø 100 mm.
- In all cases, the recommended grade must be maintained.
- On long sections of pipes, both horizontal and vertical, it is necessary to install revisions for cleaning in case of a possible blockage.

Design of outdoor sewage
The main issue in the design of outdoor sewers is the choice of the method of waste disposal.
Choosing a sewage disposal system
If it is not possible to connect to a centralized highway, choose one of the options.
Cesspool
It is not designed to dispose of a large volume of liquid effluents from a bathtub, shower, etc., and is most often equipped only to divert drains from the toilet (powder-closet). If at the same time, the exit of the sewer pipe outside the house can be lower than the level of filling the pit (for example, during rains, melting snow, an accident at the water supply), then a check valve must be installed on the pipe.
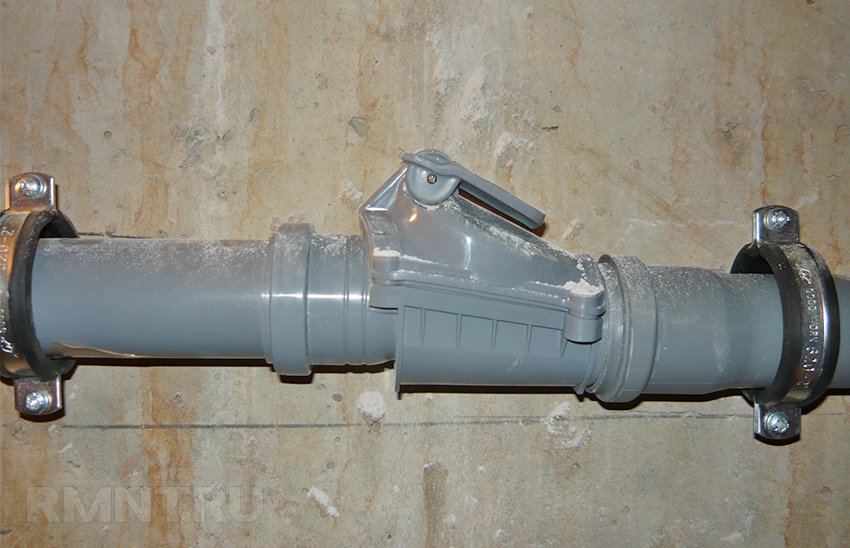 Check valve at the outlet of the sewer
Sealed Drive
It is a tank purchased or assembled with one's own hands, into which all drains are poured: from the toilet, and from the bath, and from the washing machine. Periodically requires emptying, for which they order a cesspool machine. The most budget option in the initial outlay, but requires regular operating costs.
 Hermetic sewerage tank
The drive must be equipped with a hatch for revision and pumping sewage.
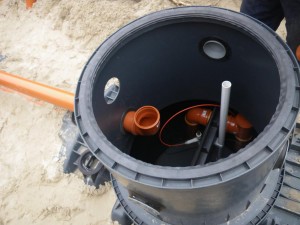
Septic tank
It is a sealed tank, consisting of one, two or three compartments (sections). On the one hand, a pipe is provided for connecting to the pipe from the internal sewage of the house, and on the other, a pipe for purified (clarified) water.
According to SNiP, the type of septic tank is accepted:
- single-section, with a volume of at least 3 m 3 - up to 1 m 3 / day;
- single-section, with a volume of at least 15 m 3 - up to 5 m 3 / day;
- two-section, with a volume of at least 25 m 3 - up to 10 m 3 / day;
- three-section, with a volume of 2.5 times more than the daily flow rate - more than 10 m 3 / day.
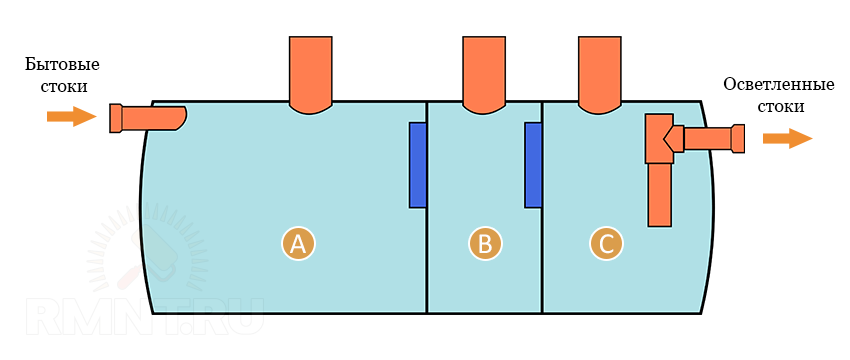 Three-section septic tank. Zone A - primary sedimentation tank; zone B - anaerobic reactor; zone C - final clarifier
Due to anaerobic bacteria (bioenzymes that live and work when there is a lack or lack of oxygen), the organics undergoes several stages of fermentation, as a result of which it decomposes to silt, gaseous substances removed into the atmosphere, and relatively clean water, the final purification of which occurs outside the septic tank in the soil . With a properly selected septic tank, after some time in the tank, biological equilibrium is established, which does not require the addition of bioenzymes.
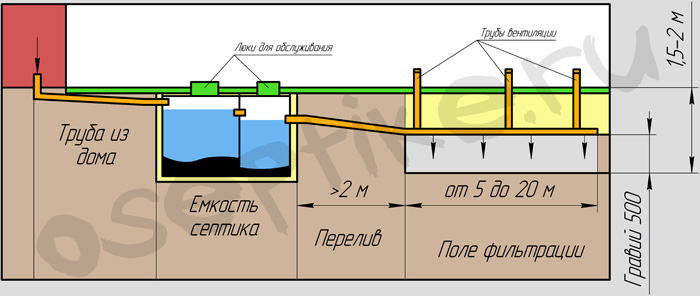
Soil post-treatment, in the case of a sanitary ban on draining sewage immediately after the septic tank, should consist of installing perforated drainage pipes laid with a slope from the septic tank on the rubble layer and covered with sand, which act as natural filters. At the end of the channel, you need to equip the ventilation pipe, lifting it above the soil level not lower than 70 cm.
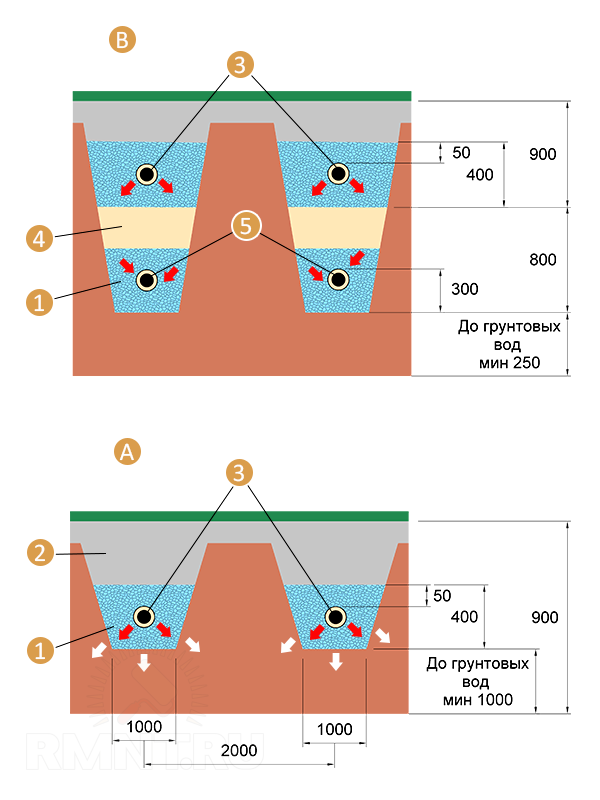 Scheme of soil post-treatment: A - absorbent trench for sandy loam and sand; B - filtering trench for clays and loams; 1 - crushed stone; 2 - final filling; 3 - absorbent pipes; 4 - filtration sand; 5 - drainage pipes
For sandy loam and sand, it is possible to equip a filter well made of brick or concrete rings, the bottom of which is covered with a crushed stone layer about 1 m deep. In this case, groundwater should not be closer than 0.5 m from the lower boundary of the crushed stone. The larger the diameter of the well, the longer it will last. Approximately the cross-sectional area should be:
- 3.0 m 2/1 person - with sandy loam;
- 1.5 m 2/1 person - in the sand.
![]() Filter well after a three-section septic tank : 1 - backfill; 2 - concrete pillow; 3 - septic tank; 4 - insulation; 5 - a well made of bricks; 6 - crushed stone; 7 - sand
Filter well after a three-section septic tank : 1 - backfill; 2 - concrete pillow; 3 - septic tank; 4 - insulation; 5 - a well made of bricks; 6 - crushed stone; 7 - sand
In the presence of large areas, low groundwater and a significant amount of post-treatment, after the septic tank, you can arrange a filter field, which is a layer of crushed stone at a depth of about 1 m, covered with sand.
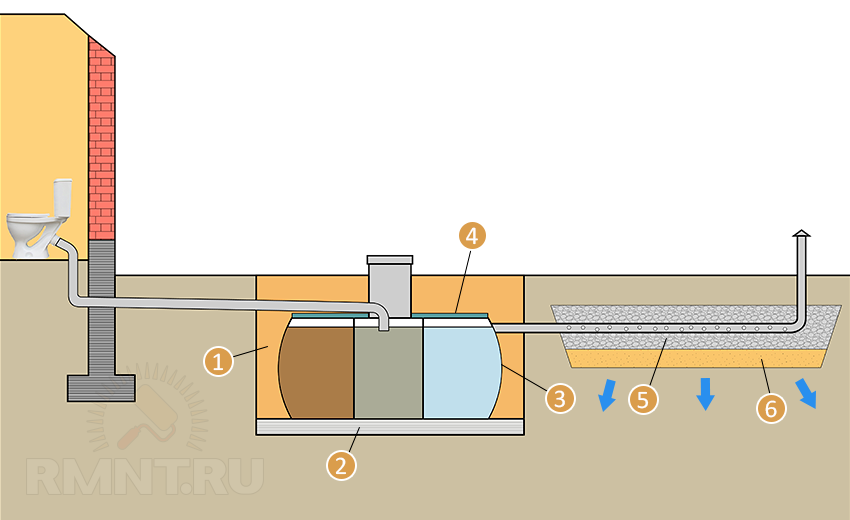 The filtering field after a three-section septic tank: 1 - backfill; 2 - concrete pillow; 3 - septic tank; 4 - insulation; 5 - crushed stone; 6 - sand
Biological filtration station
The principle of operation of the station is similar to a septic tank, but aerobic bacteria and microorganisms (requiring oxygen for life) act as a fermentation catalyst. Due to the higher oxidation rate, the decomposition of organics occurs faster, and therefore the capacity of the station can be more compact than that of a septic tank. For bacterial activity and maintaining a high fermentation rate, air is constantly supplied to the tank through a compressor, which requires constant supply and energy costs. As for the septic tank, long downtime of the station affects its operation negatively.
 Biological filtration station with aeration tank: A - receiving chamber; B - aeration tank; B - secondary sump; G - sludge tank; 1 - deflector; 2 - compressors; 3 - airlift of pumping water into the secondary sump; 4 - airlift of pumping sludge into the sump; 5 - airlift for pumping contaminated water; 6 - overflow hole; 7 - coarse filter; 8, 9 - aerator
Since fats, washing powder and detergents inhibit the vital activity of both anaerobic and aerobic bacteria, sometimes plums from various sources are separated. Water is removed from the kitchen and from the washing machine to the storage hopper for periodic removal, the remaining drains are sent to a septic tank or biological treatment plant. Other combinations of treatment facilities are possible - in several stages, for a deeper degree of treatment.
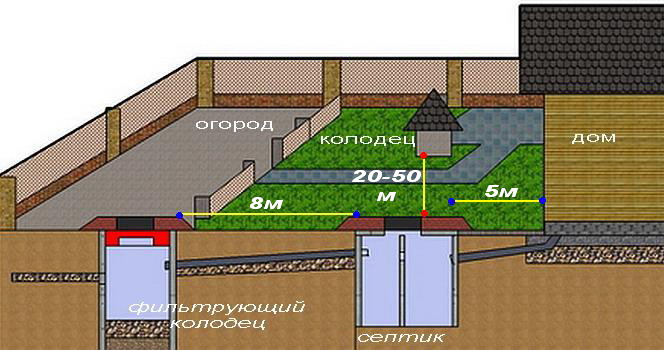
Allowed Distances
All channels of the external sewerage should also be carried out with the recommended slope. The design of treatment facilities should take into account the location on the site and beyond its limits of water intake points, utility and residential buildings, perennial plantings, reservoirs.
Allowable distances are determined on the basis of SNiP and depend on the performance and type of treatment plant.
 Allowed distances: 1 - farm; 2 - cellar; 3 - well; 4 - septic tank
Sewerage installation
After the development of the project and the purchase of all necessary materials and equipment, the installation time comes. Perform these works before finishing, in order to carry out the adjustment during the start-up of the system and it was possible to hide the wiring.
The inner pipes are bred according to the developed scheme, maintaining the necessary slopes and equipping the risers with a ventilation system. Particular attention is paid to connecting the toilet, avoiding long inlets, turns and any resistance on the way to drain into the riser. All drains from sinks, bathtubs, etc., are carried out through siphons - so you will avoid the unpleasant smell from the drain holes. If pipes are sewn into the ducts as a result of finishing work, provide for opening inspection doors.
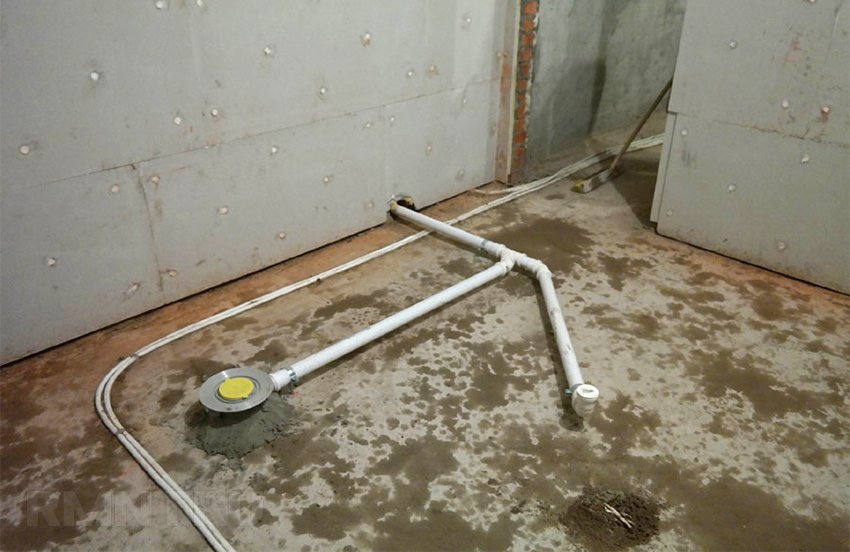
When working with pipes, they need to be cut and connected: for example, as shown in the figure.
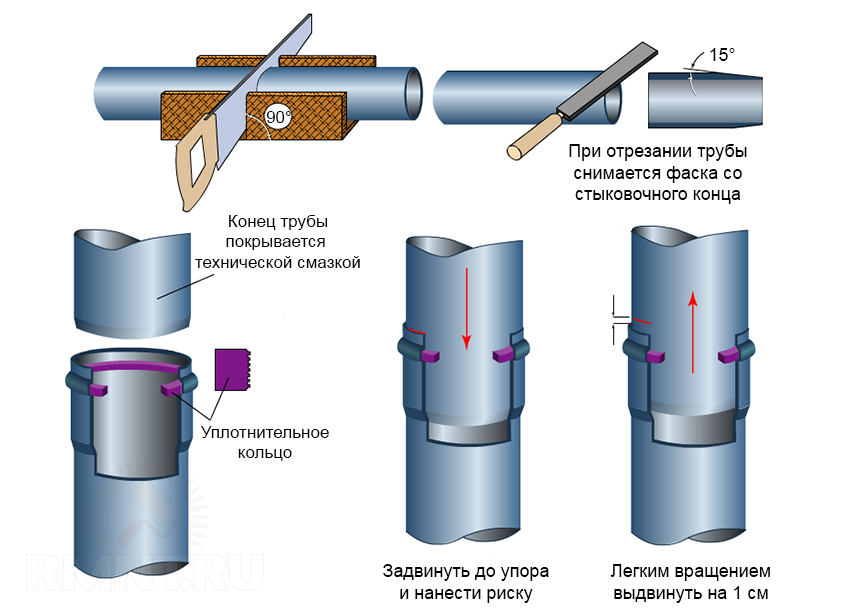
At the first stage, all earthwork is performed to lay the outer pipes and install the treatment equipment. Exactly maintain the specified distances and slopes, and when organizing soil post-treatment, the thickness and area of \u200b\u200bthe backfill layers. Alone, this work is difficult, and sometimes simply impossible. For example, for the installation of a heavy septic tank or biological treatment plant, the installation of concrete rings, etc., special equipment may be required.
When connecting pipes that can heat up during the summer, leave small (up to 10 mm in length) clearances between the pipe and the bell for thermal expansion or elongation due to soil pressure. The junction of the sewer pipe with the entrance to the treatment plant needs to be sealed and strengthened - you can use a strong rope impregnated with solid oil.
In conclusion, watch useful videos with tips on laying and joining a sewer in a private house.
Video 1. Laying sewer pipes
Video 2. Joining pipes with different cross-sections
Water from a well, a toilet on the street - all these charms of life in one's own house did not cause any surprise even 20 years ago. However, today such conditions are unlikely to suit a modern person who appreciates comfort and convenience. At the same time, work on the design and installation of a sewage system, as well as the materials and equipment themselves - all this costs a lot of money. That is why many people are interested in making a sewer in a private house with their own hands. In the framework of this short article, we will try as concisely as possible and at the same time describe in sufficient detail the sequence of laying of internal and external sewers.
On the classification of wastewater systems
As you understand, depending on the location distinguish between external and internal sewers. Elements of the internal wiring are laid at the stage of building a house, while the laying of an external sewage system may well be carried out immediately before putting the house into operation. You are very lucky if your city (city, etc.) has a centralized sewage system. In this case, you don’t have to think about the options for wastewater treatment (we will talk about this system at the very end) - it’s enough to limit ourselves to laying the internal sewerage of a private house.
The device of the internal sewerage system
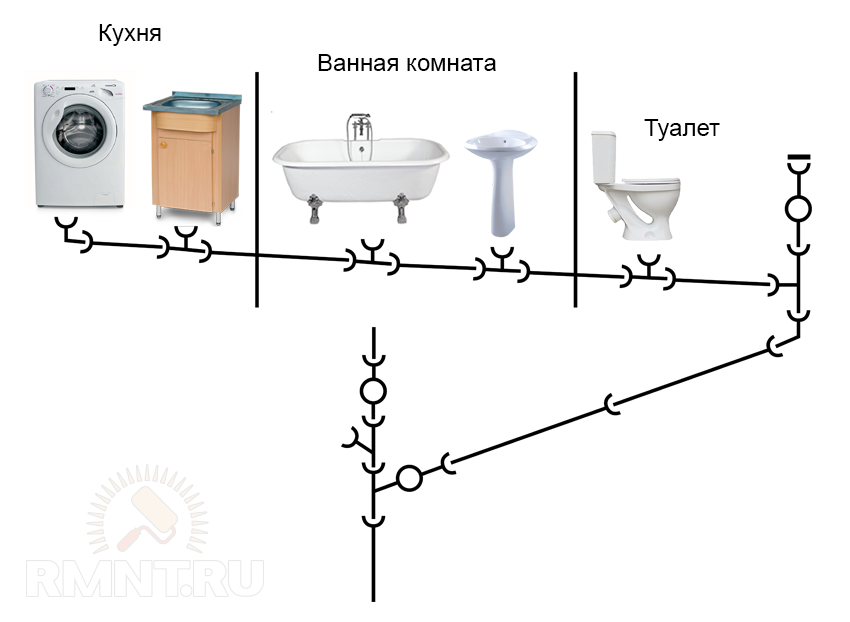
A competent approach to the design of the internal sewage system involves such an arrangement of wet rooms (kitchens, bathrooms, toilet rooms, etc.), which minimizes the length of the sewer pipe from each of them to the riser (risers). You must understand the more complex the system, the more problems with its installation and subsequent operation. The same sewer cleaning can subsequently take a lot of energy and spoil as many nerves, so at the design stage it is better to foresee everything in advance. Below we presented only one of the options for piping on the floor.
Piping system
After the design of the sewage system is over, you can proceed with the installation work: laying and wiring pipes are the most time-consuming stages of work. The main material in the usual case are:
- sewer pipes with a diameter of 100 (made of cast iron) or 110 mm (made of PVC) used as risers, horizontal collectors, which diverts the pipeline from the toilet. In the latter cases, it is advisable not to exceed the recommended length of the horizontally laid pipe 1 m to the riser;
- PVC and polypropylene pipes of a smaller diameter, for example, 50 mm, are used in the discharge of drains from the bathroom, kitchen, etc. to the collector pipe;
- elbows, tees that allow for the laying and wiring of the pipeline in any convenient way;
- revisions, due to which subsequently it will be possible to quickly decide what to do if the sewer is clogged
To date, it is more economical and more convenient to use PVC pipes and other elements of the sewage system from this material. At the same time, all turns are performed using two bends, bent at an angle of 45 degrees (i.e. you do not need to think about how to bend the pipe at home). This approach allows you to achieve a smooth drain and minimize possible clogging.
How to connect pipes
Given that sewage is a pressureless system, most of the elements of the pipelines are connected through the bells. PVC pipes have rubber cuffs, due to which one can rely on fairly tight seams between all elements. Thanks to them, replacing the sewer riser today is a matter of several hours, whereas earlier, using cast iron products, it was extremely difficult to do all the work with your own hands. Particularly critical compounds are additionally sealed with silicone-based compounds. Obstacles in the form of walls, ceilings, foundations can be passed through, it is only necessary to pre-mount the sleeves in them.
Pipe slope
Given that drains will be transported by gravity through the pipeline, it is important to maintain the correct slope of the pipeline. Moreover, for pipes of different diameters, a certain angle must be observed:
- for 50 mm - 30 mm per 1 running meter;
- for 100-110 mm - 20 mm per 1 running meter
Installation of the riser and wiring horizontal pipes
The optimal location of the riser is in the toilet. A prerequisite that must be met: access to it must be free, because the risers are mounted revisions that allow you to quickly clean up the blockage. How to hide the pipe in the toilet so that it does not violate its design? To do this, you can mount the riser in the box, a special channel, niches, etc. Its direct mounting is carried out by means of pendants or special clamps directly to the supporting wall.
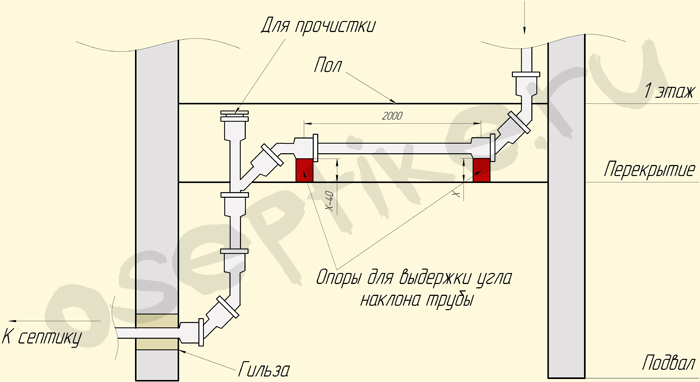
Horizontal pipe routing is carried out using oblique tees, elements of different diameters are connected by special adapters. At the junction of pipelines with gray drains (with a diameter of 50 mm), a collector pipe of larger diameter must be laid. After each turn of the pipeline, it is recommended to install a cleaning.
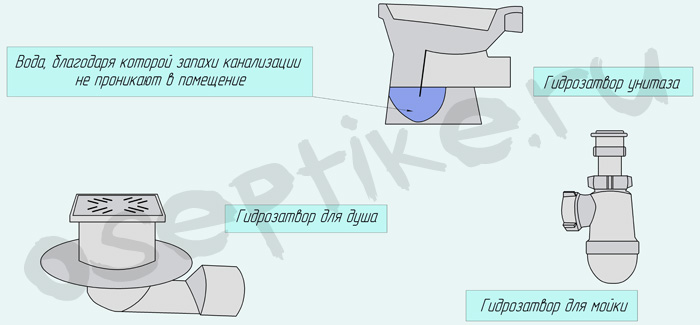
In the last two cases, an important role is assigned to the so-called hydraulic locks, the main task of which is to prevent the penetration of specific sewage odors from the system into the house.
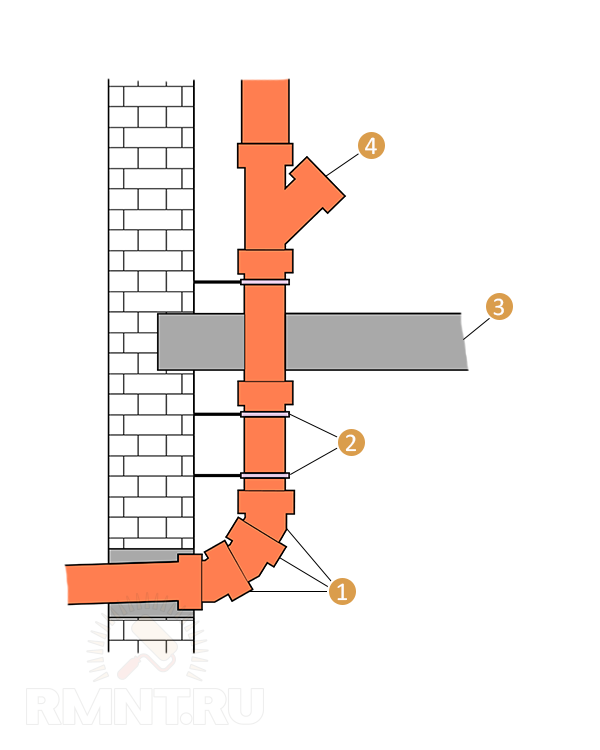
Ventilation
The ventilation pipe system is responsible for the ventilation of the sewer system, which is nothing more than a continuation of the riser pipe, which is displayed on the roof of the house. The connection of the riser and the fan pipe is carried out through the audit, and then they already operate according to one of the solutions indicated in the diagram.

In no case can you combine it with a chimney or ventilation of the house and place them on the same level! Make sure that the outlet of this pipe is not less than 4 m from the windows and balconies, above the roof, at least 0.7 m.
Do not underestimate the importance of this element, because a fun pipe:
- Eliminates unpleasant odor;
- Provides normal operation of the sewer, without water hammer due to air discharge;
- The previous paragraph has a positive effect on the durability of the sewer system;
- If there is a septic tank, then such ventilation provides a more complete course of treatment processes in it.
The release refers to the boundary part between the internal and external sewers. It is placed in the thickness of the foundation at the maximum possible depth, in order to avoid freezing of the pipeline. Correct installation allows you to subsequently avoid solving a question such as how to defrost a sewer pipe. If this condition cannot be fulfilled due to the structural features of the foundation, the pipeline is additionally insulated. Ideally, if the release was laid at the stage of building a house. Otherwise, it is necessary to punch (drill) a hole in the base for a sleeve with a diameter of 160 mm (sleeve - a piece of metal pipe protruding 150 mm beyond both sides of the foundation).

External sewage network
As you know, today a cesspool for sewers is not always a way out. Not only can it not cope with a large volume of effluents, such an approach is fraught with fines and lawsuits with environmentalists. At the same time, accumulating wastewater in a sealed container is also not always a suitable solution. After all, from time to time you will have to think about how to pump out the sewers in the house. Therefore, we recommend installing a septic tank with soil post-treatment (if the soil allows) or a deep cleaning station. The simplest diagram of the first is shown in the diagram below.
We hope that this article will help you navigate the difficult issue of a sewer system in a private house with your own hands. And you can not only save on work, but also provide the most comfortable living conditions in your own country house.