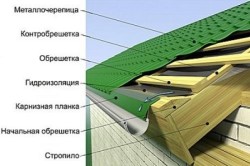
How to seal a chimney on the roof. The device adjoining the metal to the pipe. Tile bypass
The most difficult of all elements of the roof is considered to be bypassing the pipe on the roof. Even experienced roofers consider doing a neat pipe walk a challenge. ,
By the quality of the detour, you can determine the professional level of the master.
By going around a pipe or other obstacle on the roof, roofers have to solve the following problems:
- arrangement of water drainage flowing down the roof over the pipe to redirect it to bypass the pipe;
- the direction of the water flowing through the pipe to the roof so that it does not have the opportunity to get into the house.
First, it is worth considering what methods can solve the first problem.
As before doing a pipe bypass
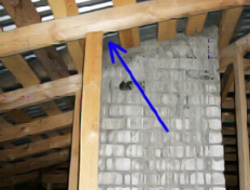
The pipe on the roof began to be installed for quite some time. The question begs, but how did in the old days do bypasses? Take, for example, the familiar slate, which until recently had been covered most of the roofs. Perhaps, many have seen how a pipe was bypassed on a slate roof, but very simply - the pipe was lined with cement-sand mortar.
And, interestingly, a similar method made it possible to solve both problems at once. However, cement, unlike sealant, begins to crack over time due to possible movements of the house. And, despite the fact that he has a good coupling with slate, he begins to let water through. That is why, in addition to laying the mortar, it was necessary to install aprons. An apron was installed over the pipe in order to protect the cement masonry from excessive ingress of water. An apron was placed under the slate in case water could seep through the cement so that it would go along the glass tray to the eaves.
Such an apron with a tray, because of the appearance, was popularly called a "tie" or "pants." The high waves of the slate made the apron completely invisible.
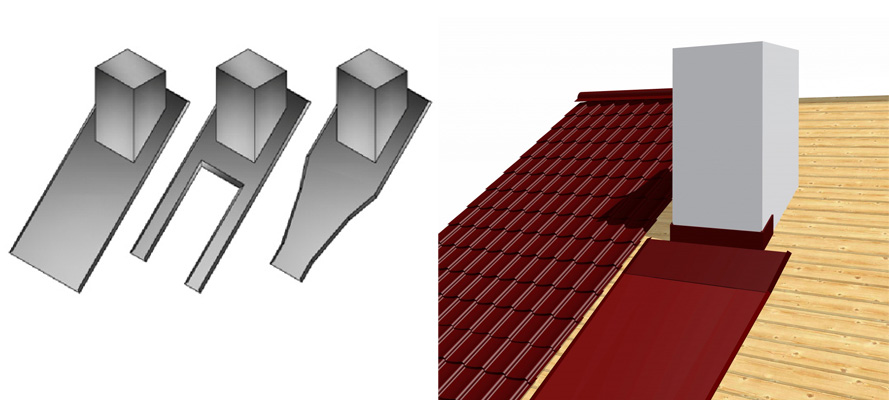
The solution using the apron-tray, of course, can be considered a kind of insurance against possible leaks or an additional element that will divert water when cracking the cement bypass. Experienced builders usually did not seek to rely only on an apron.
How to make the passage of the pipe through the metal now?
With the advent of new materials and technologies, slate roofing has become very rare. New requirements for the appearance of the roof have been introduced. As a beautiful framing of the pipe, the upper apron made of metal is still widely used in construction today. Not forgotten and the inner apron, nicknamed the "tie."
However, many people do not understand the principle of laying and designing these roof elements.
When I visited one of the construction sites, I happened to raise the apron of the pipe bypass on the roof. Water flowing from a slope installed above the pipe went directly under the roofing.
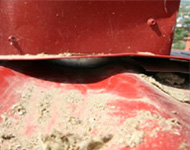

“We do according to the instructions,” the foreman explained, noting my bewilderment. It is worth saying that I was on the roof of an industrial building under construction, in which waterproofing is not provided at all, the pipe was bypassed with the help of a lower apron with a “tie”. The result could be predicted in advance: the floors were constantly wet. Well, that did not have to worry about a good finish on the lower floor.
Yes, and is it any wonder, because in the instructions of some manufacturers it is recommended to divert water from the pipes using a similar apron. At the same time, it is called the main method of water drainage, and on the slate roofs the apron was installed only for safety reasons.
An interesting analogy comes to mind: did some skydiver want to jump, taking with him only a reserve parachute, abandoning the main one intentionally? It is impossible to deny the likelihood that he will survive and will not even receive serious injuries, but you must admit that it is unreasonable to neglect the main parachute if it is available.
It would be interesting to know if anyone tried to calculate how much water will fall under the cover during the year? I will try to do this on one of the examples.
In the vicinity of Moscow, an average of 670 mm of precipitation falls annually, in other words, 670 liters of water are poured per square meter. As a result of multiplying the pipe width of 0.8 m by the length of the slope above the pipe in a projection of 4.8 m, we get a roof area of \u200b\u200b3.84 sq m. It is not difficult to calculate that 2568 liters of water fall on it per year. And all of it flows under the cover!
In spring and autumn, the following occurs: the water that previously drained freezes, the snow lying on the roof quickly turns into water under the rays of the sun, and since ice melts slowly on the inner apron, the water is forced to run around the apron. In this case, one has to rely on properly equipped waterproofing. If the water manages to find even a tiny crack, then it will not be difficult to penetrate into the room, at the same time making the insulation wet.
Apron - the same endova, but with a greater load!
The closest functional analogue of an internal apron is considered a valley. This significant element of the roof is made in the form of a gutter. The main purpose of the valley is to drain water from the roof slopes.
note
If we compare the capacity of the channels of the apron and valley of the same width, it turns out that the capacity of the valley is several times larger than the capacity of the apron. And the amount of precipitation is the same!When installing the apron, care must be taken not to accidentally jam the flange. After all, even slightly jammed flanging can significantly reduce the capacity of the apron
Today, aprons of various shapes are made. Most often, structures have a uniform width along the entire length.
Features of fastening the apron when going around the pipe
Speaking of fixing the valley, it is worth noting that according to the standards, the screws should be twisted at a distance of 25 cm from the axis of the valley. The shape of the gutter of this element of the roof contributes to the organized movement of water. Therefore, there are no leaks.
When a sheet of metal tile is applied to the apron, it turns out that in any case it will be stitched with screws, and in many places. And since a flat apron cannot have a certain axis of movement of water, it spreads over the entire surface. And in its path holes made by self-tapping screws inevitably turn out to be.
Any joints and joints on the roof of the house must be insulated from moisture with a waterproofing apron.
Such places include the passage through the roof of the ventilation pipe, the joints of two roofs or the roof and the wall, as well as the junction of the chimney and roof.
Varieties of aprons for roofing, their replacement and installation
There are several options for installing waterproofing aprons, which, accordingly, affects the implementation of their overhaul.
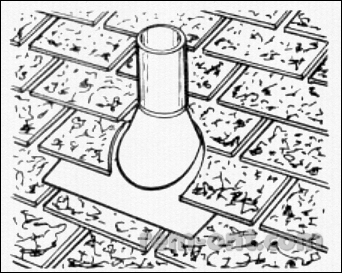
Modern waterproofing apron for a chimney mounted on a tiled roof.
Replacing the waterproofing apron in the pipe passage through the roof
The passage of the metal ventilation pipe through the roof needs waterproofing. It is protected by a metal-neoprene apron, which is worn on the pipe. Tiled over the apron. The following drawing describes in detail the procedure for replacing the apron and tile in case of damage or deterioration.
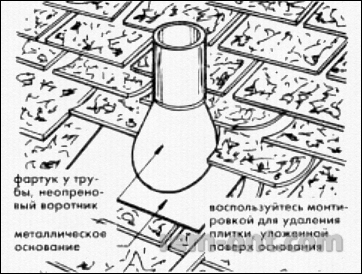
1. Remove the tiles that overlap the base. Items:
- a pipe apron and a neoprene collar;
- metal base;
- tiles can be removed by mounting.
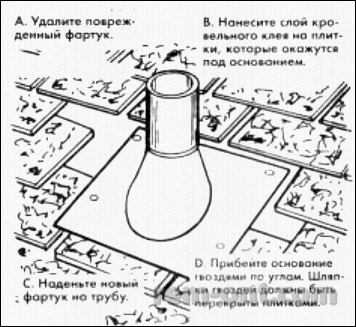
2. Remove the old apron, put a new one on the pipe and nail it to the roof with ordinary nails.
- Remove the damaged apron.
- Apply roofing adhesive to the tiles below the base.
- Put a new apron on the pipe.
- New the base is nailed. Nail caps must be covered with tiles.
3. Reinstall previously removed tiles. The joints between the base and tiles must be covered with roofing glue.
Installation of the apron at the junction of the frame structure to the wall
In places where the roof is joined to the wall, a copper or aluminum apron is used, and it is installed under the wall lining. Such a waterproofing apron practically does not need care.
All elements of the apron are installed on top of the roof tile and nailed to the wall. Then the next tiled row is laid out against the wall, and another element of the apron is placed on top of it. This element is nailed with two nails at the upper edge to the wall sheathing. Each subsequent element of the apron should overlap the previous one by approximately 51 mm, and also cover the nail heads.

1. On top of a series of roofing tiles waterproofing elements are mounted. What is used for this:
- sheathing;
- the tile is glued with roofing glue;
- angular waterproofing component made of metal;
- felt
- nails.
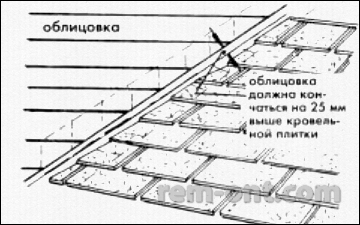
2. Mounting on top of the apron. The cladding should be injected 25 mm above the level of the roof tile.
The wall cladding is installed only after the apron and tiles have been laid. Facing is also sometimes called siding. The cladding should cover the apron, but the end of the apron should be about 25 mm higher than the roof tile. If you see that the gaps (seams) between the waterproofing elements can allow water to pass through, scoop them up with some quality material for outdoor use.
Roof drain pipe waterproofing video
This video shows how to install butyl rubber waterproofing for a drain pipe. The same material is used for pools and other structures.
When waterproofing a pipe, it is important not only to install the required insulating material, but also to use the correct gluing methods. In particular, a rubber tape with self-vulcanization and a special composition for protecting joints and corners. In addition, the laying and smoothing of the film is carried out using a special tool.
Installing an apron on a brick wall
A two-layer apron is installed when the roof is adjacent to a brick wall. The first waterproofing layer consists of corner elements. They are nailed to the roof, and glued to the wall using roofing glue.
The second waterproofing layer is represented by L-shaped elements. The bent end of the element is laid in the masonry seam, and the main part covers the first layer.
Installation of a double layer of waterproofing at the junction of the roof with a brick wall
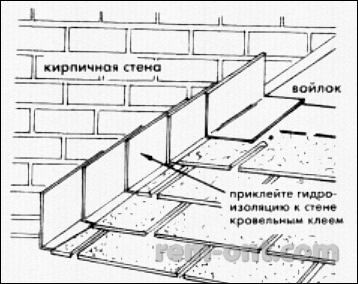
1. Install corner waterproofing elements on top of each tiled row, then glue them to the wall with roof glue.
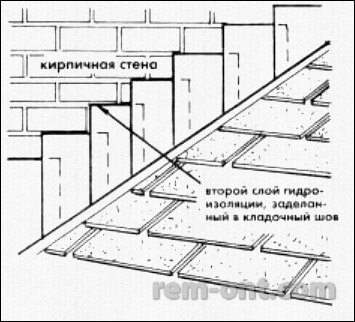
2. The second is mounted on the first waterproofing layer. The seams on the top besides are sealed with mortar.
In order to lay the end of the waterproofing element in the masonry joint, it is necessary to knock out the solution to a depth of about 38 mm from it. Then you can insert part of the element into the seam and seal it with a solution in a new way.
After the solution has set, check to see if the waterproofing layers are tight enough.
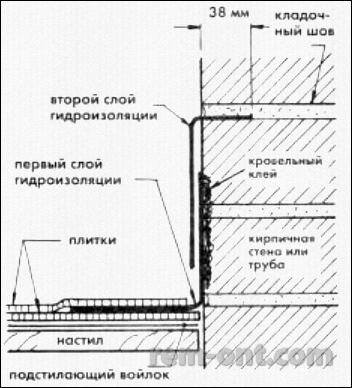
Double layer waterproofing structure:
- masonry seam;
- roofing glue;
- brick wall or pipe;
- waterproofing layers;
- tiles;
- flooring;
- bedding felt.
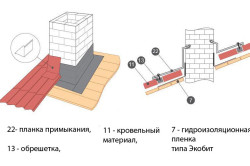
Installation of a waterproofing apron on a chimney
As a rule, there are two types of chimneys in houses: brick and prefabricated metal factory-made. The metal pipes manufactured at the factory are delivered already with an apron in the kit. Such an apron is similar to that used in combination with a ventilation pipe. Install it strictly following the manufacturer's instructions.
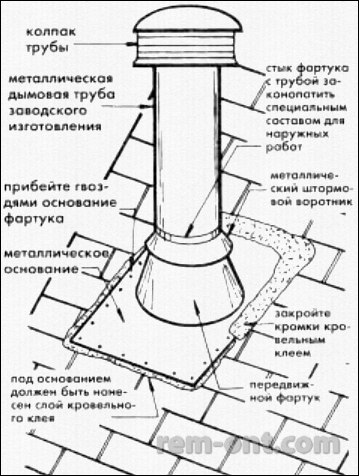
Installing a factory-made metal pipe with an insulating apron:
- pipe cap;
- chimney metal pipe (factory);
- the base of the apron is nailed;
- metal base;
- a layer of roofing glue is applied under the base;
- the junction of the apron with the pipe must be caulked with a special composition;
- metal storm collar;
- the edges are covered with roofing glue;
- removable apron.
You may be tempted to cover the unsightly metal pipe on the roof. You can install around it a decorative frame casing, consisting of wooden racks and cladding.
As a cladding, you can use wood or any other cladding material.
Despite the fact that a waterproofing apron is already installed at the pipe itself, it is also necessary to make it around the lining. The second option is also possible: ceramic tiles “brick-like” can be glued to the pipe sheathing, and their joints can be repaired with mortar. Recommended tile thickness should be 13 mm.
Covering a metal pipe with a decorative casing.
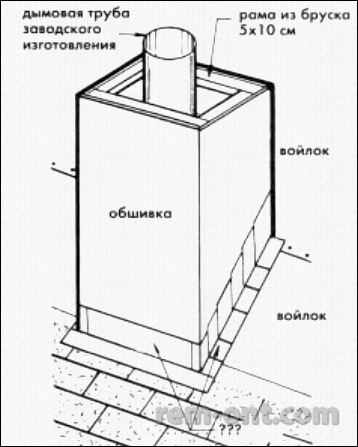
1. Mounting the frame structure around the pipe. Items:
- factory chimney;
- frame from a bar (5 by 10 cm);
- sheathing;
- felt.
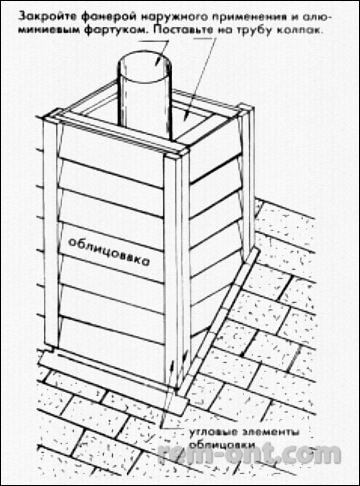
2. Installing cladding under the apron. The pipe is closed with plywood and an aluminum apron. Then a cap is placed on it.
Using a two-layer apron
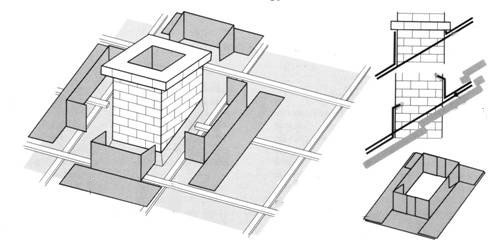
Brick pipes are characterized by a two-layer apron. Its installation takes place in a similar way as in the case of isolation of the junction of the roof with the wall. To insulate a brick pipe, elements of a special shape are needed.
Some of them should cover the front side of the pipe, while others should cover the back. The installation of waterproofing on a brick pipe should begin with the device on the rear side of the chimney pipe. This chipper must be covered with tiles that cover the entire roof.
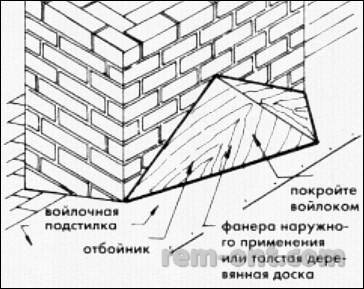
Installing a chipper from the back of a brick pipe:
- felt litter;
- chipper;
- outdoor plywood or a fairly thick wooden board covered with felt.
Further below the front side of the chimney you need to lay the roof tiles. Having cut out the metal base of the insulating apron, you can proceed with its installation on the front side of the chimney. Do not forget to pre-cover the masonry with a layer of roofing adhesive to stick the base of the apron to the roofing tile.
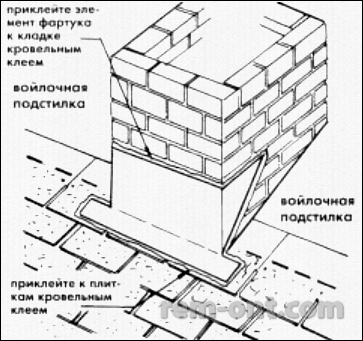
Installing an insulating apron on the front of the pipe:
- part of the apron is glued to the masonry using roofing glue;
- use felt litter;
- the litter is also glued to the tiles with roofing glue.
Drawing of a standard apron element for the front side of a brick chimney.
Apron corner elements
Then you can begin to install the corner elements of the apron. Such an angular element is installed, gluing to the brick pipe masonry on one side, and nailing the floor with nails on the other. On top of the installed elements, you need to lay out a number of tiles that must be glued to them with roofing glue.
This tile needs to cover the entire joint up to the rear side of the pipe. The installation procedure for the second layer of waterproofing is similar to that used in the case of insulation of a brick wall.
Installation of corner elements of waterproofing.
Bump insulation
Having dealt with the frontal and angular sides of the pipe, you can smoothly proceed to the isolation of the chipper, which is located on the rear side.
The insulating apron of the chipper is glued to the pipe masonry with roofing glue, and is attached to the roof sheathing with the help of strips. The apron should fit snugly to the roof, pipe and the bump itself. Large chippers are recommended to be covered with roofing tiles.
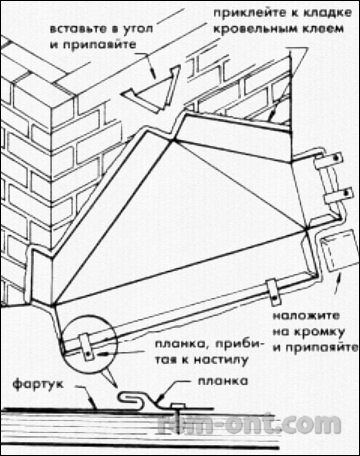
Installation of a waterproofing apron on a chipper. Essential elements:
- the apron is glued to the masonry using roofing glue;
- insert the apron into the corner and solder;
- apron;
- the bar is nailed to the flooring;
- the strip is superimposed on the edge and also soldered.
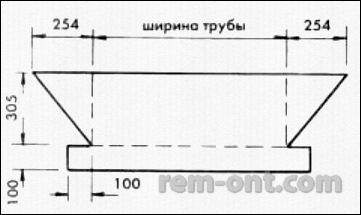
The apron for a chipper is made of an aluminum sheet. Before proceeding with its pattern, it is strongly recommended that you make a paper model of it and attach it to the chipper to check compliance with all sizes. The layout can be cut from stiff thick paper. If the dimensions of the layout are correct, and it is ideally laid on the chipper, according to its template, you can proceed to pattern an element from an aluminum sheet.
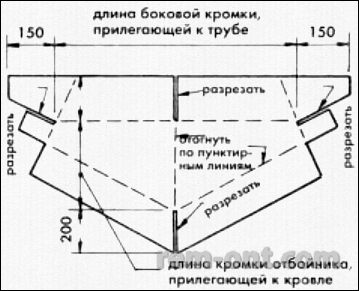
Diagram of an apron element pattern for a chipper. Note:
- the length of the side edge that will abut the pipe;
- cut lines;
- dashed line for bending;
- the total length of the edge of the chipper, which is adjacent to the roof.
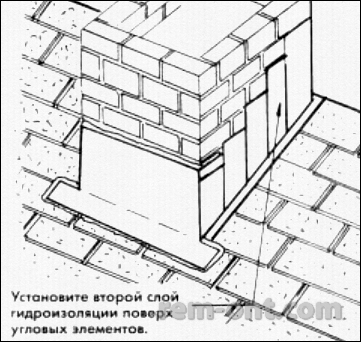
Then it is necessary to install a second layer of waterproofing and one long element on top of the frontal part. It should be brought into the seam of the masonry at 38 mm. On the back side, the edge of the bumper apron should be covered by a second layer of insulation.
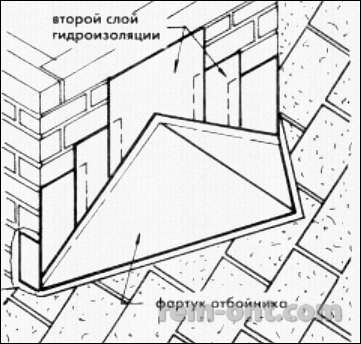
Installation of the second layer of insulation on the apron of the chipper.
We determine the place of leaks in the pipe
Chimney leaks can last for years. To determine the location of the leak, check the joint of the apron. As a rule, the metal base itself is in good condition, and the job is to remove the old solution of the second layer of insulation and reseal its seam.
If the seam is not badly damaged, you can use high-quality sealant. Sealants can also seal the edges of the second layer of waterproofing. The need to replace the metal itself is extremely rare. If the apron of your pipe is made of galvanized steel, it is recommended to treat it with an anticorrosive composition and also paint it with enamel for outdoor use.
- Difficulties in flowing around pipes
- The points of abutment of the coating to the chimney
- How to get around the pipes on the roof?
- How to get around a metal pipe?
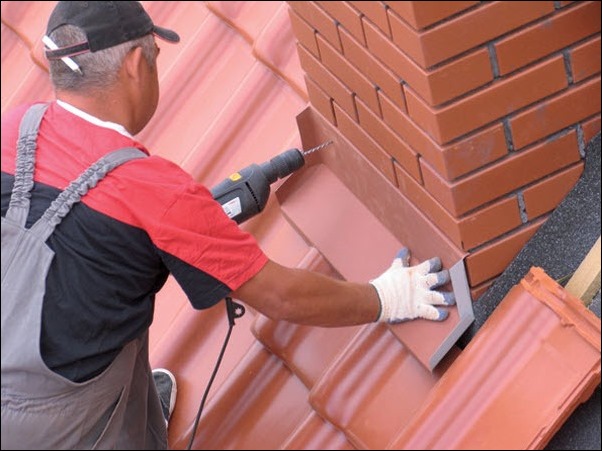
One of the most difficult construction operations is bypassing the pipe with metal. It is quite difficult to bypass objects (including the chimney) during the construction of the rafter system and the installation of the roofing. Only experienced craftsmen undertake this. It is the quality of the chimney bypass that usually determines the competence of the roofer. It is very important to ensure the water tightness of this section and the integrity of the coating near the pipe.
The process of bypassing a pipe with a metal tile is one of the most difficult construction operations, therefore it is carried out by professionals.
In the process, you should carefully and carefully measure and work with metal, trying to avoid damage to it. It is worth noting that such "obstacles" exist and existed on all types of roofs, so roofers had to solve such problems very often. Over the entire long history of construction, the technology for bypassing chimneys has been worked out. Separately, we note the fact that each roofing material has its own bypass technology. About how to properly bypass chimneys and ventilation hoods during the installation of tiles will be described below.
Difficulties in flowing around pipes
During the installation of the roof when laying roofing material around the pipe, it must be remembered that the roof must perform the following functions:
- Prevent moisture from accumulating near the pipe and ensure its discharge. In this case, it is necessary to ensure the water tightness of the site on the roof.
- Particular attention should be paid to the junction of the roof and the pipe. Since water can drain along the walls of the pipe structure, it is necessary to carefully isolate this section. This should also include the prevention of condensation on the brick pipe of the chimney (since the latter will heat up).
At the same time, the sections of metal adjacent to the chimney, ventilation pipes and other technological exits are considered the most difficult to seal on the roof. If they are not sealed, this will lead to the absorption of moisture by thermal insulation (this will cause rotting of the material and a decrease in insulating properties), the rafter system (the tree will begin to rot, the life of the structure will decrease), and the air circulation will deteriorate due to condensation.
To solve these problems of creating tight zones near the output technological structures in advance (during design), special attention should be paid to where the passages under the pipes will be made.
It should be remembered that the height of the chimney and ventilation holes depends on their location on the slopes. So, the pipes should be 0.5 m above the ridge. The best option for the location of the ventilation outlets and the chimney is the exit at the ridge beam. With such an arrangement of pipes, precipitation accumulates on them much less, which greatly facilitates the work on their sealing.
Back to the table of contents
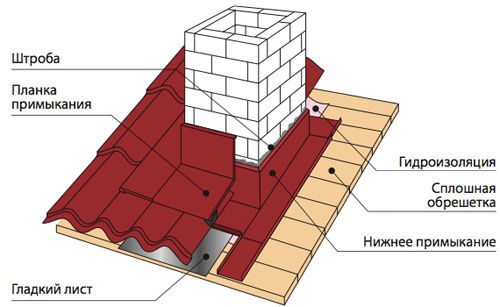
The points of abutment of the coating to the chimney
Especially for metal roofing, a device for connecting the roofing to chimney pipes was developed. It is usually called an apron. Laying (installing) such a device requires some preparatory work. To do this, an additional crate is stuffed near the chimney, it is also necessary to prepare a metal tile (cut sheets) and lay the sealing layers on the crate.
When the preparatory work is completed and the chimney is successfully removed, proceed to seal the junction of the roof with the pipe. Such works are divided into several stages. The first is the installation of internal protective devices (aprons). Next, a metal tile is mounted on it. Then the outer apron is installed.
If the installation of the apron is done by yourself, then some tools should be prepared: disks for the grinder and the tool itself, hammers (wooden and ordinary), marking tools (meters, rulers, levels, felt-tip pens, pencils, etc.). Next, plaster the surface of the pipe to better fit the insulating layers. After that, they begin to bypass.
Back to the table of contents
How to get around the pipes on the roof?
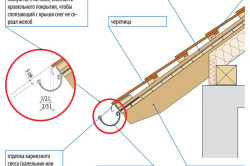
First, make a waterproofing gutter. It is started on slopes, at a higher level than faces (up to 0.8 m). The gutter must be in a layer of insulation to remove moisture from there. Next, the crate is mounted (optional). The next step is laying the tiles. For its implementation, the sheets should be cut off (according to the shape of the chimney) at points where there is an abutment to the pipes. The coating is laid in accordance with the recommendations of the manufacturer of the metal tile.
The next stage is drawing on the side faces of the marking lines, which are made slightly higher (about 15 cm) the level of the roof.
They indicate the height of the apron. According to the marking, it is necessary to carefully grind so that the strobes walked only on the brick, without damaging the masonry. After that, the surface is cleaned of dust, which will be a lot. It is important to pre-cover the roof with a film so that the dust does not damage the coating of the metal tile. After cleaning, the strobes are filled with silicone (or other transparent sealant).
Next, prepare the bracket for attaching the apron. It is laid in a shtroba, in a layer of sealant, and then attached to a metal tile with self-tapping screws. Similarly, all parts of the apron strip are mounted, which are subsequently connected to each other, after which a sheet of metal is placed under the apron. It is mounted under the bottom edge of the apron. Its edges are bent with a hammer and pliers. It is designed to prevent water from entering the chimney from the roof.
It is important to remember that the apron itself is mounted on the roof so that it is located on the pipe masonry about 15-20 cm above the level of the tile.
When the bar for attaching the apron is ready, the apron (external) is mounted. A metal tile sheet should be mounted on the bar so that it covers the bar for fixing the apron and goes on the sheet of metal that flows around the pipe. In this case, it is necessary to carry out the installation of an internal apron, which is installed between the metal tile mounted on the bar and the “main” coating that flows around the pipe. It should prevent moisture from entering the roof.
When the metal tile is installed around the chimney and on the bar, proceed with the installation of the outer part of the apron. This part does not have additional protective and insulating functions, but is intended for decoration at the place of pipe passage. It is installed in accordance with the manufacturer's instructions, while installing carefully, so as not to spoil the decorative (or paint) coating. The main difference between the installation of the outer part from the installation of the inner one is the system for fixing the bar for adjoining the chimney. To do this, you do not need to lay the strobes in the masonry of the chimney, enough fastening with screws to the brick is enough. After that, the plank is covered with a layer of silicone, after which it can be plastered or painted.
The listed works describe the abutment device and work on the flow around a chimney made of kiln brick. For metal pipes (which can both remove smoke from the stove and ventilate the bathrooms), the flow around is different.