How to install a heater in an apartment. What may be needed to install a boiler with your own hands? The standard water supply scheme of the apartment.
Taking into account the growing utility tariffs, storage water heaters, which can play the role of both the main and additional source of hot water supply, are becoming more and more relevant in the past. In today's article, we will focus on self-installation of boilers.
The advantage of installing a thermodynamic water heater. On the other hand, it is important to emphasize that a thermodynamic water heater can be more or less noisy depending on where it is installed, thereby creating hearing discomfort for passengers living in or near proximity in the case of a split system where the heat pump is located outside.
Why should we replace your electric water heater?
Finally, it should be noted that the performance of such a water heater is random and varies depending on a number of parameters, such as climatic conditions or an air intake. He will know how to transfer you to a competent specialist who can install equipment that meets your expectations and your needs.
What is our installation of an electric water heater
Electrical safety of an old hot water cylinder. emptying the old hot water cylinder; removing, removing and removing the old hot water tank. installation of a new hot water cylinder, systematic replacement of the electrical safety group included in the cost of the storage tank, connection to existing connections with current standards: electricity, water supply and drainage, leak control, power and testing, cleaning the workplace, user tips, adjusting the hot water temperature according to your needs.Installation options for an electric water heater
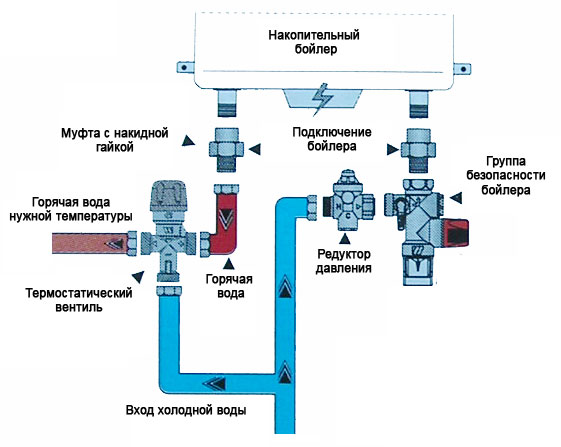
Installation of a pressure reducer, if the water pressure exceeds 4 bar, installation of a thermostatic mixing valve to prevent the risk of burns and the development of legionella. tripod 1 hour of labor for complex installations or with exclusive access.Water heater installation conditions
The place of installation should be accessible, understandable and should not include any changes or transformations of the immediate environment of the balloon. The building in which the product will be installed must be equipped with an elevator that can support the size and weight of the equipment. The power supply will comply with the standards in force at the date of installation and compatible with the selected product. Replacing the hot water storage tank will be in the same form, vertical, wall, base or horizontal, and equivalent liter. A mounting wall or floor will support the load. The upper part of the container will be located at a maximum height of 2, 50 m from the ground. Brass fittings are prohibited at this level. . Be sure that our installers may intervene, but be sure to indicate one of these cases when transferring your order.Important! Often, boilers are installed in the toilet, bathroom or in the kitchen - that is, in the immediate vicinity of the water intake points.
Do-it-yourself boiler installation - is it possible?
These cases may be subject to additional billing by our teams on site, depending on the time and equipment needed. 
What is needed for the preparation of hot water? Provide this water at any time, in sufficient quantity and at the right temperature. This is an important element of comfort in the living environment.
Equipment that meets this requirement is numerous and efficient. Their choice depends on many criteria: the existing heating system, family size and habits, available energy, housing characteristics, etc. professional help allows you to install the equipment that is most suitable for this situation.
Immediately, we note that in the absence of minimal knowledge in the field of plumbing, it is better to entrust the installation to specialists. This is more true for apartments, because if mistakes are made during installation, then neighbors from below will suffer.
Simply put, self-installation is a risky procedure. But if you carefully study the manufacturer’s instructions and act strictly according to the technology, then no problems should arise, especially since such an option has its advantages a, such as:
And to keep sanitary hot water? How much hot water is consumed each day? It depends, of course, on the number of users and their habits. However, it is important to know how to evaluate it in order to select equipment that meets your needs. For example, a shower for 4 to 5 minutes consumes 30 to 40 liters of water, a bath for 150 to 200 liters, and hand dishes about 50 liters per day.
Combined or independent production of hot water

Systems combined with heating
Sanitary water is heated by a boiler; this installation must be carried out by a professional or very well-informed master. Independent systems. Sanitary water is heated by an autonomous system: electrical resistance in the case of the following explanations, but it can also be done through a burner, solar heat collectors or heat pump. sheet of "new energies". Production can be instant or saved.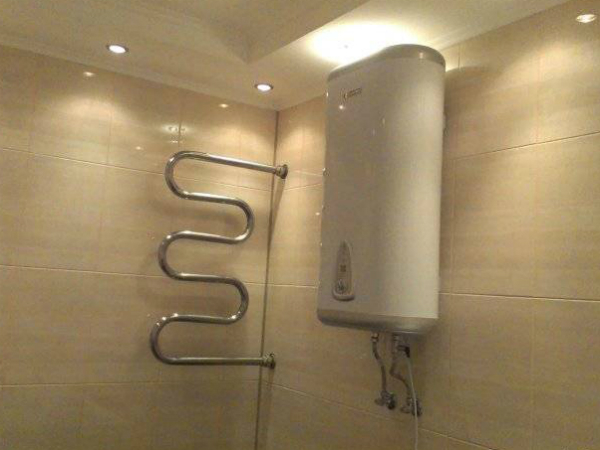
Moreover, if the repair begins in the room in which the water heater is installed, then no specialists will be needed to dismantle the device, since everything can be done with your own hands.
What will be required in work

The case selected for the rest of the form is accumulation
Heated water is stored and maintained at a temperature in a thermally insulated tank. The flow of hot water is constant and important. In the case of a boiler, the immersion heater heats the water at the right temperature. For this system, in order to be economical, it is necessary to subscribe to the tariff option, which allows heating or heating water during periods per kilowatt hour cheaper.
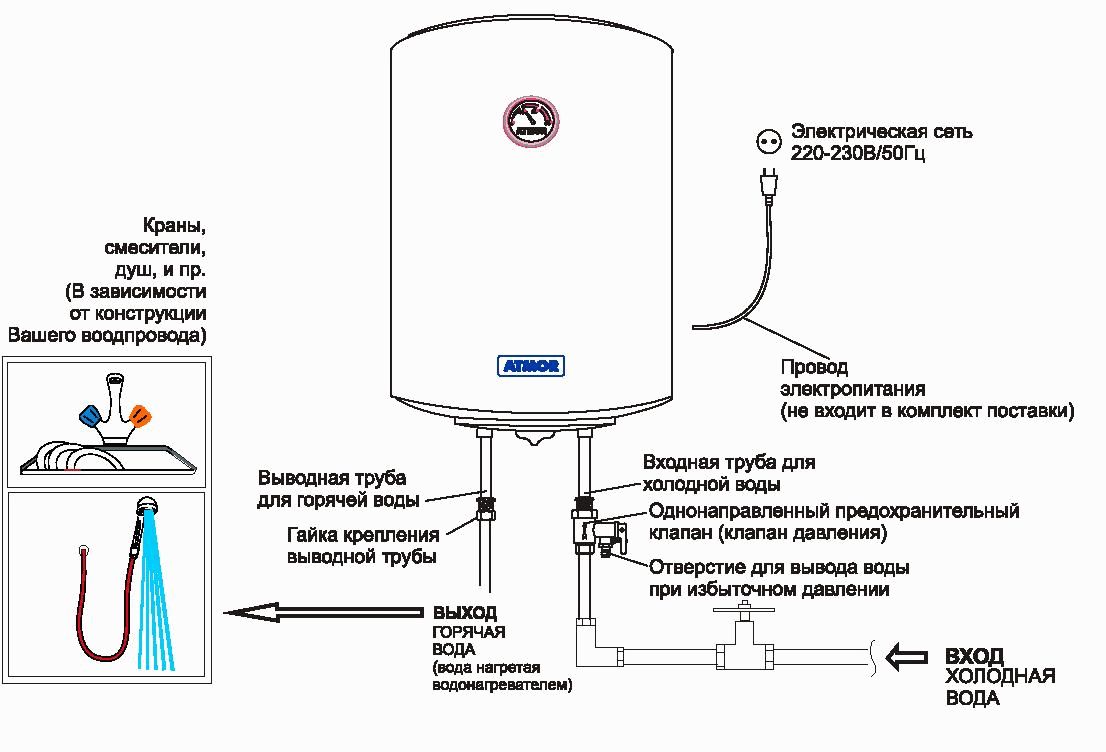
Replacing or installing an electric water heater is an operation that a handyman has the opportunity to run into. The first task is to turn off the electricity to the corresponding circuit breaker, then the cold water supply circuit to the nearest water meter or shut-off valve.
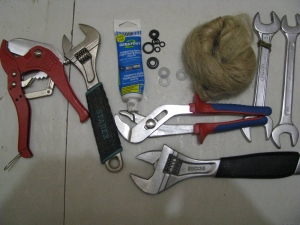
For installation, you need to prepare a number of tools:
- hammer drill;
- roulette wheel;
- mounting level;
- phillips screwdriver
- pliers;
- adjustable wrench;
- marker.
In addition, you will need to purchase:
- polypropylene pipes;
- fUM tape (or, alternatively, linen tow).
Wall mounted water heater (traditional)

If this is a replacement, be sure to drain the used water heater. To simplify the explanation of location, supply lines, distribution and evacuation should be considered as already available. Therefore, they only need to be connected. Use the bubble level to measure the cylinder attachment points to the desired height if you do not have a drilling pattern normally supplied with the package.
Drill the wall with a drill adapted to the material and the recommended diameter for the screws provided. Anchor carefully, as the water ball weighs heavily. Tighten the screws with a wrench, or better, an eye wrench or pipe, precisely adapted to the size of their hexagonal head. Leave a minimum distance of 1 cm so that the pendant arm of the can easily pass between the wall and the screw head.
The device can only be installed on a supporting wall, in the maximum proximity to the water intake point, because the temperature of the water moving through the pipes decreases.
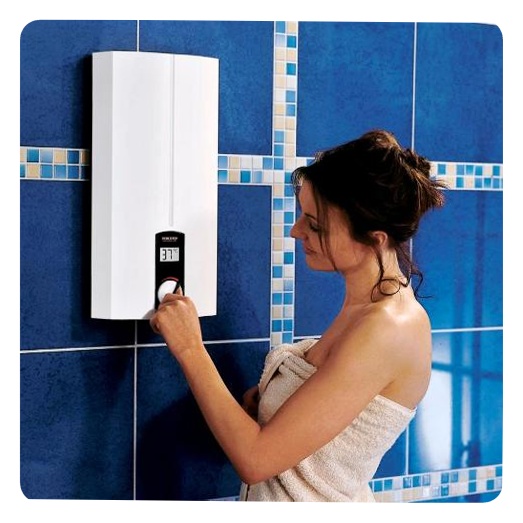
Important! Mounting height depends only on ease of use. The user should easily turn on one or another temperature mode, if necessary.
The following are the steps.
Hang a balloon that, empty, has no significant weight. Ensure that the latch bolt head is securely locked in the slots of the suspension arm. If the position is correct, make sure that the final cylinder mount is fully tightened with bolts. This allows you to not forget about it at the end of the operation. Get help installing a new device so that it can hang without damage on the two legs that are the screws or bolts that you just installed.
Tighten the nuts or lock bolts to lock the instrument in place. Make sure it is level. Establish a hot water and cold water connection. The safety block is equipped with a maneuvering lever. Connect the stainless steel connecting hose to be sealed by the gasket.
Step 1. First you need to choose a place to install. In this case, you must adhere to certain requirements.
Connect the other end of the hose to the cold water line. Remember to replace the seal. Screw on a stainless steel fitting at the hot water outlet with a gasket that will be connected to the home's hot water distribution network. Connect the other end of the hose to the hot water pipe.
Using a wrench and a flat wrench, tighten the ends of the stainless steel fittings, one in the inlet and the other in hot water. Screw a siphon for overflow to the foot of the safety block, which will be connected to the exhaust channel. Insert the slide sleeve equipped with a flexible white plastic drain hose into the siphon outlet.
Step 2. The heating elements with which the water heaters are equipped are always very powerful, because the speed of heating the water should be maximum. In this regard, certain requirements are presented to the wire that will be used when connecting. There are a lot of them and manufacturers usually indicate them in the data sheet. We only note that the minimum diameter of the wire should be 5-6 mm.
The conical seal on the sleeve, tightened by screwing the ring on the thread of the outlet, also provides seal and block assembly. Cut the white plastic hose on request and screw it in again. 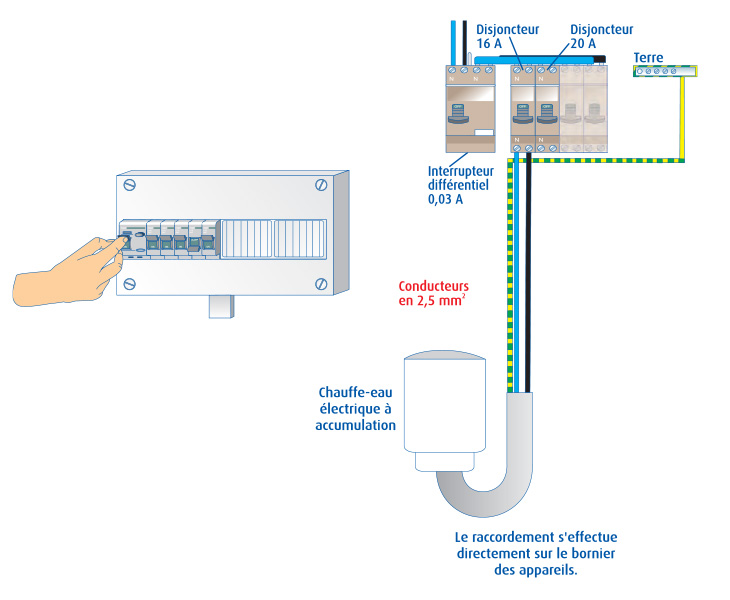
The electric water heater is now equipped with plumbing connections. It remains to provide a new power source.
Pull your power line as far as possible until it is fed to a 30 mA relay or directly to the distribution panel, but it is strictly forbidden to connect it directly to an electrical outlet even with the appropriate amperage. Remove the protective cover with a screwdriver.

Open the connection terminals of the electrical circuit. Find the symbols and check the installation instructions for the location of these connections. Separate the three wires from the insulation line. Connect the blue and black or brown wires to the corresponding terminals.
Then attach the ground wire to the terminal marked with the ground logo. Close the cover, taking care not to pinch the wires during operation, and fasten the clips again. To open the water tank and fill the tank, open the water inlet valve. Half the opening of the first collection point in the hot water circuit allows air to be evacuated as soon as the balloon is full. This operation must be performed before turning on the device.
You should also find out the maximum voltage for which the meter is designed (if it is less than 40 A, then the meter is replaced with a new, more powerful one), after which purchase a switch for a specific number of amperes and an additional 3x6 mm cable.
Step 3. After the preparatory work, you can proceed directly to the installation. On the wall it is marked where the lowest point of the heater will be located. Next, the distance between the mark and the upper mounting plate of the device is measured. Holes are made according to marks.
Only when the water heater is full can the electrical connection be switched on at the electrical panel. When water flows regularly into the airless valves, close them: your boiler is working. Landlords and tenants have a role to play in servicing rental housing.
Your mailbox has a label with the names of the signatories of the lease. Do not overload it, you risk making it illegible and prevent the postal service from distributing mail for you. Keep the water flows in perfect working condition and avoid any drains on the facades when watering your plants.
Important! No holes are provided in the strip itself. Fastening is carried out using hook-shaped anchors.
In the walls of brick or concrete, a drill bit is used to make holes, if the wall is wooden, then the standard one will do. The diameter of the holes should be several millimeters larger than the diameter of the dowels.
Installation of parabolas and any antenna is subject to authorization: each installation should be the subject of a preliminary written request to an agency in your sector. If you have a basement, you should monitor and maintain it in the same way as an apartment, and guarantee effective closure.
If possible, do not install the kitchen appliance under a gas water heater and do not leave the air intakes free. If you have a mixed boiler, be sure to maintain a water pressure between 1, 5 and 2 bar. Periodically check that the drainage grooves and drainage holes are free and lightly lubricate the hinges, cremons and moving parts.
After this, the dowels are clogged and the anchors are screwed onto which the heater will be hung. Anchors are turned all the way, then a mounting plate is put on them.

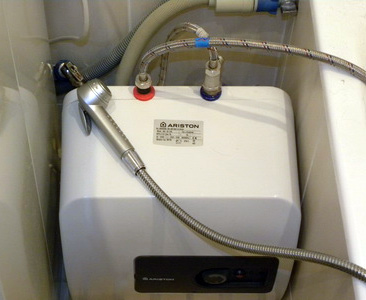
Step 4. When connecting to the water supply, flexible hoses or PP pipes are used. There should be two connectors on the case:
- red for hot water;
- blue for a cold fence.
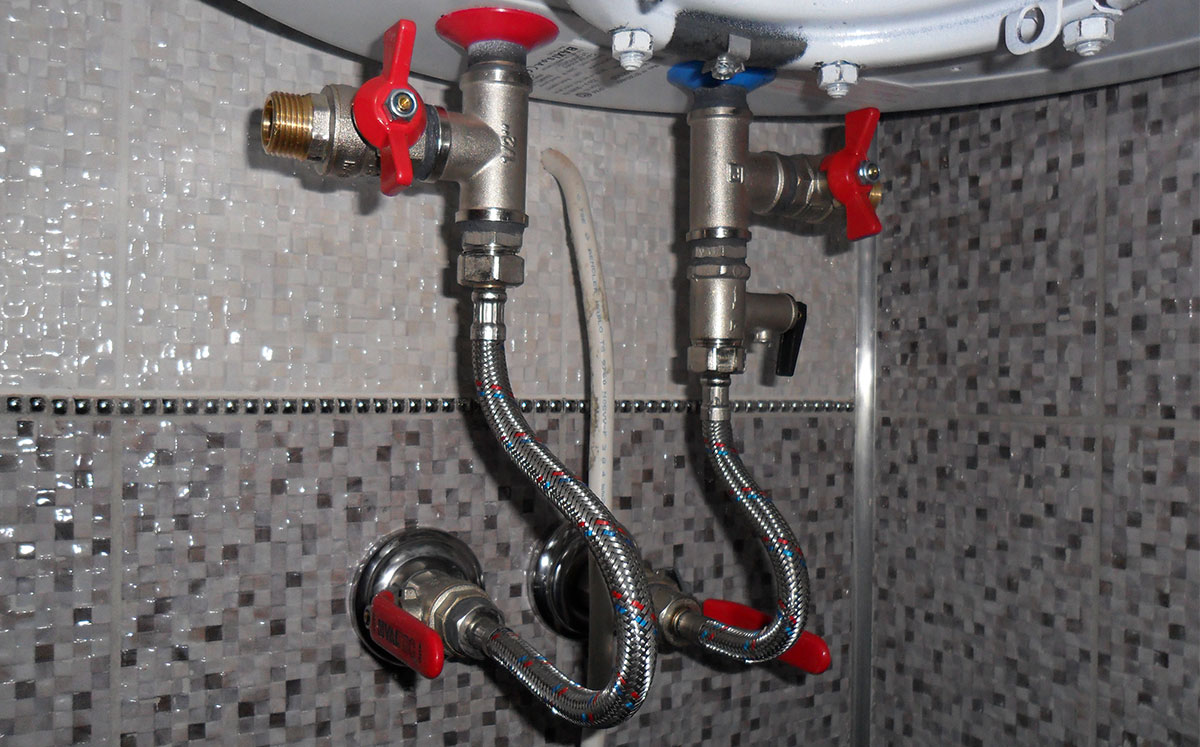

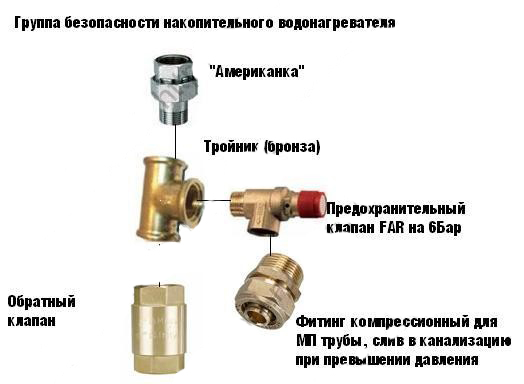
The safety valve, which comes complete with a water heater, is installed before entering cold water. To do this, the connection point is wrapped with FUM tape, a valve is screwed, and a hose is screwed onto the valve located below. Also, the second end of the hose is screwed to the hot water pipe.
Video - Do I need a safety valve
Then the cold water hose is screwed to the water supply and connected to the blue hole. At this point, it is desirable to install a ball valve to always be able to shut off water if necessary.
The "plumbing" activities are completed, it remains only to connect the heater to the network.

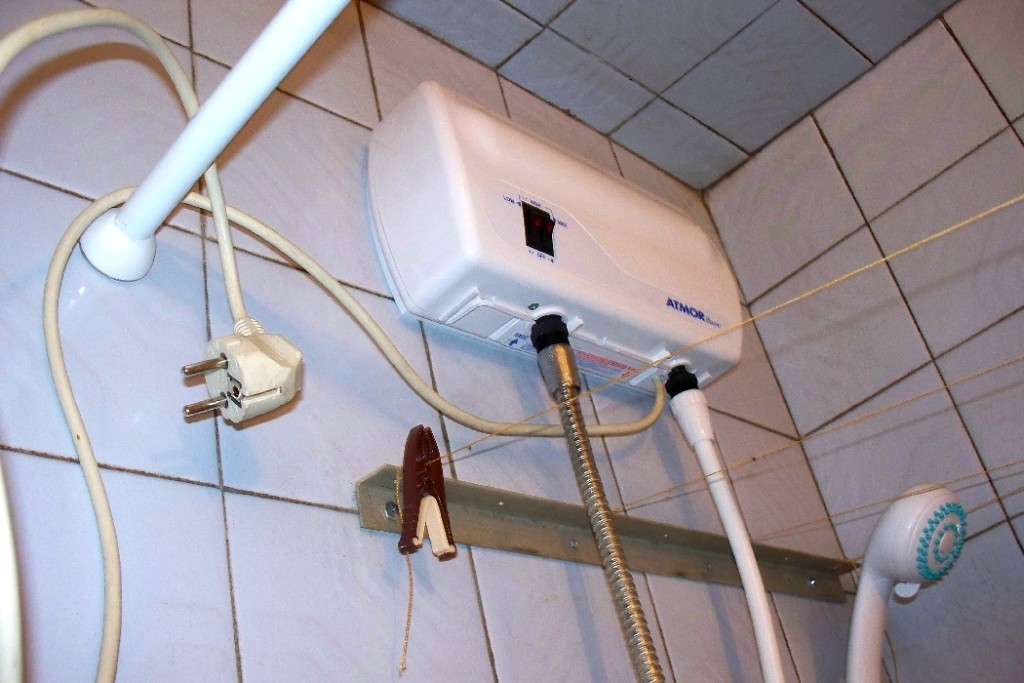
Step 5. The safety relay, cord and plug must be supplied with the boiler. Before connecting, a grounded outlet is installed near the heater.
You can go the other way - put an automatic switch. This is convenient because all the switch terminals are already marked:
- blue wire is zero;
- brown for phase;
- yellow (or any other color except the first two) for grounding.
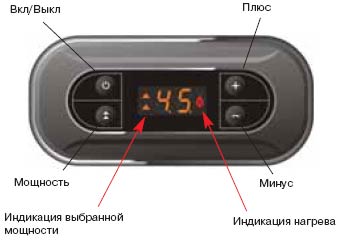
After connecting all the contacts, voltage is applied. If everything is done correctly, the indicator on the boiler will light up. It remains only to fill the tank and set the desired temperature.
Important! The device must not be connected to outlets with a power exceeding 3 kW. In addition, connecting other electrical appliances to this outlet is not permitted.
Step 6. Checking the system. After filling the tank, a hot water tap opens - this is necessary to remove air. After switching on, the device works for several hours, then you can begin active operation.
Video - Installation and connection of a water heater
Features of installation in the apartment
The main feature of a city apartment is the lack of space. If the walls of the toilet are finished with tiles, then installing a boiler there will be quite difficult. The only option in this case will be installation on the back wall, where a small cabinet is usually located for masking sewer pipes or storing household chemicals.
Step 1. Immediately note that in the cabinet you can put a heater with a volume of not more than 10 liters. First, the cabinet is freed from all contents - cleaning products, shelves, lids and the bottom.
Step 2. Then, the center-to-center distance of the fasteners, the dimensions of the cabinet and the gap between it and the wall are noted. The latter is marked, the points of fasteners are indicated. Holes are made in appropriate places, dowels are hammered into which anchors are screwed.
Step 3. The water heater is hung on anchors.
Step 4. The cabinet is assembled back (of course, the shelves and the bottom are no longer used), and the device is connected in the same way as in the previous paragraph of the article.
Sometimes water heaters are installed under the sink, but only an oversized rectangular shape is suitable for this. In such a place, the boiler will not hurt, moreover, its surface will be protected from water.
Important! When connecting to the mains, you need to take care of grounding and separate wiring.
The opinion that compact heaters are inefficient are erroneous. Most of them have enough power to heat more than 2 liters of water per minute. Otherwise, the installation of a heater under the sink does not differ from the traditional installation method.

Features of installing a boiler in the country
Boilers are widely used in private homes. If we are talking about a cottage where they live mainly on weekends, then there is probably no heating boiler there. Therefore, at each visit there are certain difficulties associated with hot water supply. To avoid them, install a boiler.

The operational specificity of water heaters in the country is that the water pressure is almost always unstable. This is no longer a city apartment in which the pressure is always the same, because it is supplied from a centralized water supply network.
In view of this, at the dachas, water-heating equipment is installed 2 m above the nearest water intake point. Due to this, water will circulate naturally even in the absence of pressure.
Regarding the installation technology, it is in this case the same.
When installing / operating the boiler, it is not recommended:
Video - What to pay attention to during installation
In conclusion
Scientific progress has already reached a level at which everyone is able to provide himself with comfortable living conditions (including hot water), regardless of whether he lives in the city or outside it. The purchase of a storage water heater provides a number of advantages, and the main one is complete independence from a centralized water supply. With the latter, as you know, quite often planned and unplanned outages occur.
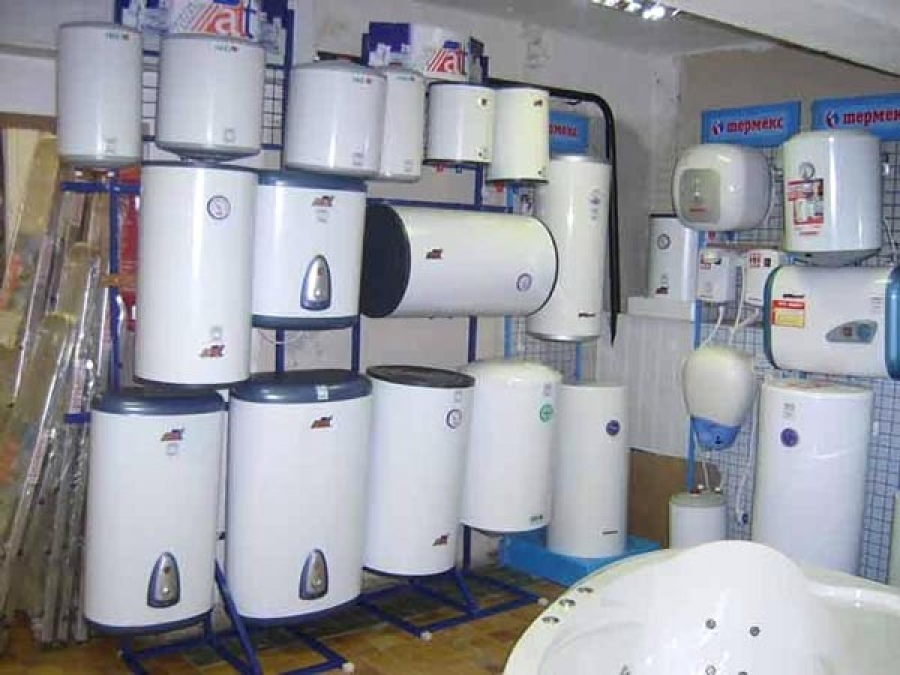
The range of modern boilers is wide enough so that everyone can choose a model that meets all the requirements and preferences.
Today, hot water is very often supplied intermittently, which causes inconvenience among residents. To solve this problem, people purchase a flow or storage water heater. What to do next with it?
Learn how to install a boiler and connect it to the water supply in the apartment yourself to avoid cash costs for plumbing services. In this article, we will tell you the basics of this work and tell you what you can easily do yourself, and what is better to entrust to a specialist.
When choosing an autonomous source for heating water these indicators should be taken into account:
- Tank volume (taking into account the number of people living in the apartment).
- The power consumption of the device.
- Internal coating of the tank (it is recommended to pay attention to magnesium or anode rodswhich are protected against corrosion and scale).
- Dimensions and other features of the unit.
Find out more information about choosing a boiler for an apartment.
Installing a system for heating water does not take much time. On average, it will take about two hours to fully assemble and connect the water heater to a branch from the central riser.
Preparatory work
Immediately before the installation phase of the unit, you must:
- it will be determined exactly where the device will be located;
- prepare supplies and tools.
Search for a place
The first step in the installation process of the boiler is to find the optimal location. When choosing a mounting area, the following factors must be considered:
- The water heater must be positioned so that so that the water in it could not freeze. That is, the "boiler" must be protected from the effects of the external environment.
- The distance to the point from which the water comes should be minimal. In a situation where the points of drawdown are significantly distant from each other, it is advisable to install two devices.
- The place for the boiler should be in close proximity to the hot and cold water fittings, so that it was not difficult to bring it to the device.
- Around the water heater free space should remain to perform future maintenance.
- The wall defined for the installation of the boiler must be solid and free from visible defects. When choosing a place, it is worth remembering that the walls (partitions) in the bathrooms of old houses often have a different "nature", due to the peculiarities of construction in a given period.
It is customary to distinguish the following types of partitions:
- thin wall of the sanitary-technical cabin (mainly in the "Khrushchev");
- plank partition between the bathroom and the ventilation shaft (in the "Stalin" and the old-style houses);
- internal wall of gypsum concrete, foam concrete, drywall (in new buildings).
The most suitable surface for fixing the water heater are walls made of gypsum and foam concretethat can be found in modern homes. However, if it is necessary to carry out work in an old-style apartment, where the wall may be too thin and not strong enough, then a more stable support for installing the boiler should be found than overlapping in the bathroom.
To determine the thickness of the wall, you can “tap” it. If it is made of modern materials, then you can attach a device whose volume is 100 liters. Boilers capable of heating up to 200 liters are fixed exclusively to load-bearing walls.
Tools and Supplies
For installation you will need special devices and tools. When installing a water heater, the device itself and two rubber hoses for the water supply will be required. Mandatory conditions for them:
- flexible;
- length up to two meters (the segment will depend on the distance to the water supply point).
Also required:
- dowel-nails with a hook on the end in the amount of two pieces;
- a safety valve, as a rule, comes with an electric water heater;
- valve for the tap, the diameter of which must be at least 10 mm (note that the specific size of the part will depend on the diameter of the water pipe);
- sealing tape, or plumbing flax.
- electric drill, rotary hammer (optional);
- drills for walls made of bricks (with a victorious tip);
- adjustable wrench;
- screwdrivers.
Part Requirements
After buying a boiler, which is not worth saving, preparatory work should be carried out. These include the following items:
- Analyze the condition of the electrical wires before installation. If the "electrician" is outdated and needs to be dismantled, then the best option is replacement of elements before installing the boiler.
Connecting a new water heater to faulty wiring can cause irreparable damage to health and the power supply system. Therefore, it is reasonable to consult a specialist before problems arise.
- Inspect the piping before installation.. It happens that it is impossible to make an insert in old pipes, then you have to change them. This process can be carried out independently.
- Choose your preferred installation location subject to IP (International Protection) zoning, strength and material of which the wall is made.
The purpose of the International Protection classification is to protect household appliances from contact with water. In the bathroom, there are certain places where it is dangerous to install household appliances. Therefore, the bathroom space is conditionally divided into four zones.
It is customary to systematize this area on a scale from zero to three:
- Zero zone accounts for plumbing tanks (bathroom, washbasin).
- First- is in close proximity to them (at a distance where the drops reach).
- Secondprovides a distance of 60 cm from the plumbing, installation of a boiler in this area of \u200b\u200bthe apartment is considered acceptable.
- Third zoneimplies a distance of 2.4 meters from water sources, sockets, transformers, etc. are installed in it.
Installation steps
After the place for the water heater has been determined, there comes a moment of direct installation.
Device mounting

- Start by marking the wall. The process must be performed to the nearest centimeter. Set the distance between the fixtures to the nearest walls and ceiling. Use the tape measure to mark the wall.
- Make holes in marked areas using a rotary hammer or electric drill.
- Screw pre-prepared anchors into the holes. A water heater is mounted on them.
- Make sure the boiler is level: in one line with ceiling and floor. This is done through a building level.
Water connection
- Necessary to implement tap from hot / cold piping system. For such a connection, conductors are installed in the pipes. In some cases, to avoid cutting pipes, tees are fixed at the point of connection of the mixers.
- On each pipe that goes to the boiler, cranes are fixed. If possible, they are installed as close as possible to the place where the branch occurs. Often, taps are attached directly to the tee.
- Then the valve is installed in the cold pipeline. The valve controls the process of water entering the water supply system from the boiler. The valve must be fixed to the "cold pipe", in the safety valve itself there is another tap that opens to release water from the heater.
It also has a drain pipe. It is on this pipe that the hose is fixed, which drains water into the sewage system (under the sink).
Arrangement of a point of consumption
- it is necessary to determine the location of the "grounding phase" (red wire) and "zero" (blue wire);
- a shield is mounted on the side of the unit, the machine latches on and a cable passes directly through it;
- the cable itself must be exposed to insulation by 10 cm and connected to the terminals of the machine;
- the phase of the electrical panel is screwed on from above, and the phase of the device is screwed down.
In cases where this is not possible, the water heater is connected to a conventional outlet. Here excluded the connection of other additional equipment.
For security a double automatic machine is installed next to the boilerwhose power will be similar.
Power connection
 Convertible energy source means alternative, ecologically "clean" power plants of a "home" sample (wind generators, photocell panels, boilers, etc.).
The scheme for connecting to alternative sources is quite complicated. One way is connection with motor shaftwhich is connected to the generator by means of rotors or by means of a hydraulic arrow to a gas boiler.
To the gas boiler
Indirect heating device - it is a container with thermal insulation containing water for various needs. Water in an indirect boiler is supplied in the direction of two circuits:
- heating (connected to the heating system at home);
- for heating water (coming from the water supply system).
Before installing an indirect water heater you need to know three principles:
- Cold water is supplied through the lower part of the device, hot water exits through the upper part.
- Water, or pipe passes inside the boiler from top to bottom.
- In the center of the device is a recirculation point.
When installing an indirect boiler, one of the following three mounting options is used:
- connection method with a three-way valve;
- with two circular pumps;
- with hydraulic arrow.
With three way valve
If residents use large amounts of water, it is advisable to choose a connection method with a three-way valve. For this purpose, two circuits are produced:
- main (for space heating);
- separate (for heating water).
As a gap between the above contours three way valve used. Normal operation of the system is only possible with a correctly configured thermostat.
Please note that due to the technical features of the indirect boiler, the temperature inside it will be higher than the temperature of the coolant in the boiler.
With recirculation pumps
An alternative to a three-way valve may be the method with two circular pumps, where check valve provided. With this type of installation, two circuits are also required. A pump is used to control each of them.
A feature of installation is that the circular pump is fixed in front of the heating. To control the performance of the pumps, a water temperature sensor is used.
With hydraulic arrow
 Despite the fact that each circuit is provided with a circular pump, to balance the various flows, a hydraulic distributor is used (usually consists of a hydraulic needle and a manifold).
Differential pressures observed in different circuits can also be adjusted. using balancing valves.
The installation scheme of an indirect boiler in the apartment is quite complicated and its it is better to entrust a specialist.
To electricity
The process as a whole consists of two stages:
- Connecting the unit to the shield via a cable or removing the outlet for the water heater.
- Establishing a connection between the boiler and the water supply system. In other words, the binding of the device.
From this video you can learn in detail how to install a device for water heating with your own hands:
- The easiest installation option is an electric boiler. In this kind of water heater there can be 1 or 2 TENA. It is better to choose a double one: since one of the heating elements can fail, then the second will replace it. If desired, one can be turned off to save.
- To increase boiler performance recirculation recommended.
- If you purchase a large volume water heater (200 liters), please note that water in it is heated for a long time (up to 6 hours). And installation of the unit is possible only on the floor (installation on the wall is excluded).
- Each person consumes up to 20 liters of water per day. Use this quantity when determining the required volume of the instrument tank.
- In the case of using an electric heating element - grounding is done.
- It is reasonable to foresee the possibility of turning off the indirect boiler from the gas boiler and install special taps for this.
In general, installing a water heating system does not require much experience. The main thing is to take into account the type and method of connecting to a power source. Also necessary thoroughly comprehend the project and take into account access to the electrics, water supply, and drain lines. And if you have to connect the unit to alternative power sources (or a gas column), then without fail, consult or entrust a specialist to fully connect the water heater.